
Broken Academy Single Sign On
The application is up and running but when you try to sign in, you’re getting an error. These errors show up in Sentry, which is great, but how can we use Tracing and Logs to help troubleshoot the issue?
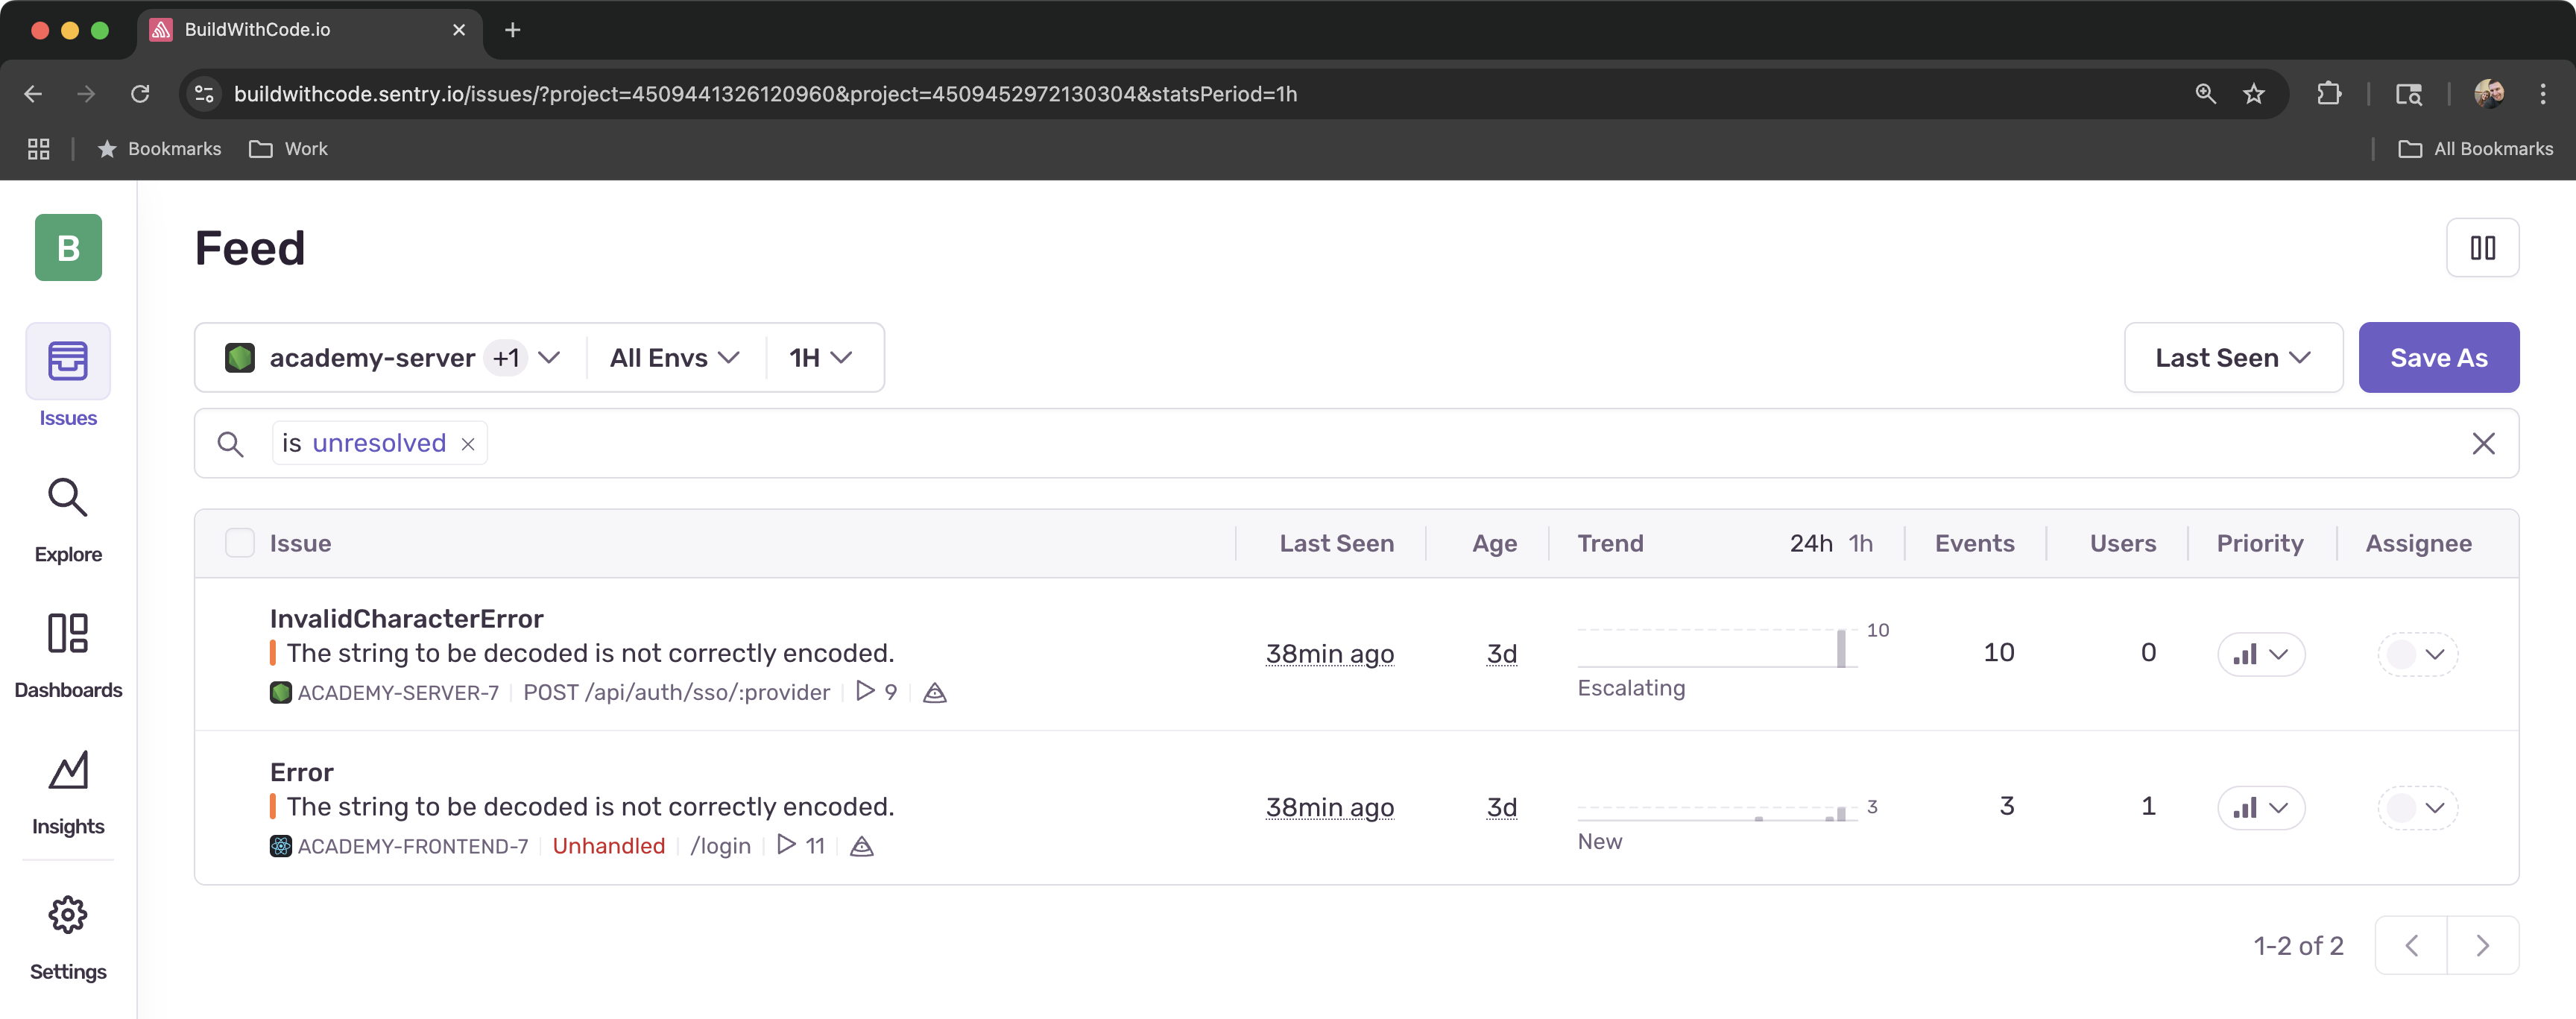
Learning Objectives
By the end of this module, you will:
- Create Custom Spans that will track specific attributes within your application
- Use Trace Explorer to search for specific spans that match issues in your environment
- Explore trace waterfalls to understand where in the trace issue happens
- Implement logs in your application to give you more context around the issues happening within your application
- Search and review logs to help troubleshoot issues in your application
Frontend Implementation
Let’s start by instrumenting the frontend authentication flow to track login attempts and user credential processing.
-
Add Sentry Import to Frontend Login Component
Navigate to the
/apps/frontend/src/components/auth/LoginForm.tsxfile and add the Sentry import at the top:import * as Sentry from '@sentry/react'; -
Set Up Frontend Logging
Add the logger destructuring after your imports to access Sentry’s logging functionality:
const { logger } = Sentry; -
Replace the Complete handleSSO Function
Replace the entire ‘handleSSO’ function with this instrumented version:
const handleSSO = async (provider: string) => {setError('');setIsLoading(true);try {await Sentry.startSpan({name: 'sso.authentication.frontend',op: 'auth.sso',attributes: {'auth.provider': provider,},},async (span) => {const userCredentials = fetchSSOUserCredentials(provider);logger.info(logger.fmt`Logging user ${userCredentials.email} in using ${provider}`);span.setAttributes({'auth.user.id': userCredentials.id,'auth.user.email': userCredentials.email,'auth.user.name': userCredentials.name,'auth.user.avatar': userCredentials.avatar,});const loginSignature = createAuthenticationToken(userCredentials,provider);span.setAttributes({'auth.login_signature.defined':loginSignature !== undefined && loginSignature !== null,});await ssoLogin(provider);});navigate('/');} catch (err: any) {logger.error(logger.fmt`Failed to login with ${provider} - issue with loginSignature`);setError(`Failed to login with ${provider} - issue with loginSignature`);throw err;} finally {setIsLoading(false);}}; -
Test Frontend Tracing
Try logging in again. In Sentry, navigate to Explore > Traces in Sentry’s left navigation menu, and search using the
span.descriptionfilter withsso.authentication.frontendas the value. You can type this in full or choose thespan.description isfilter below the input to streamline the workflow.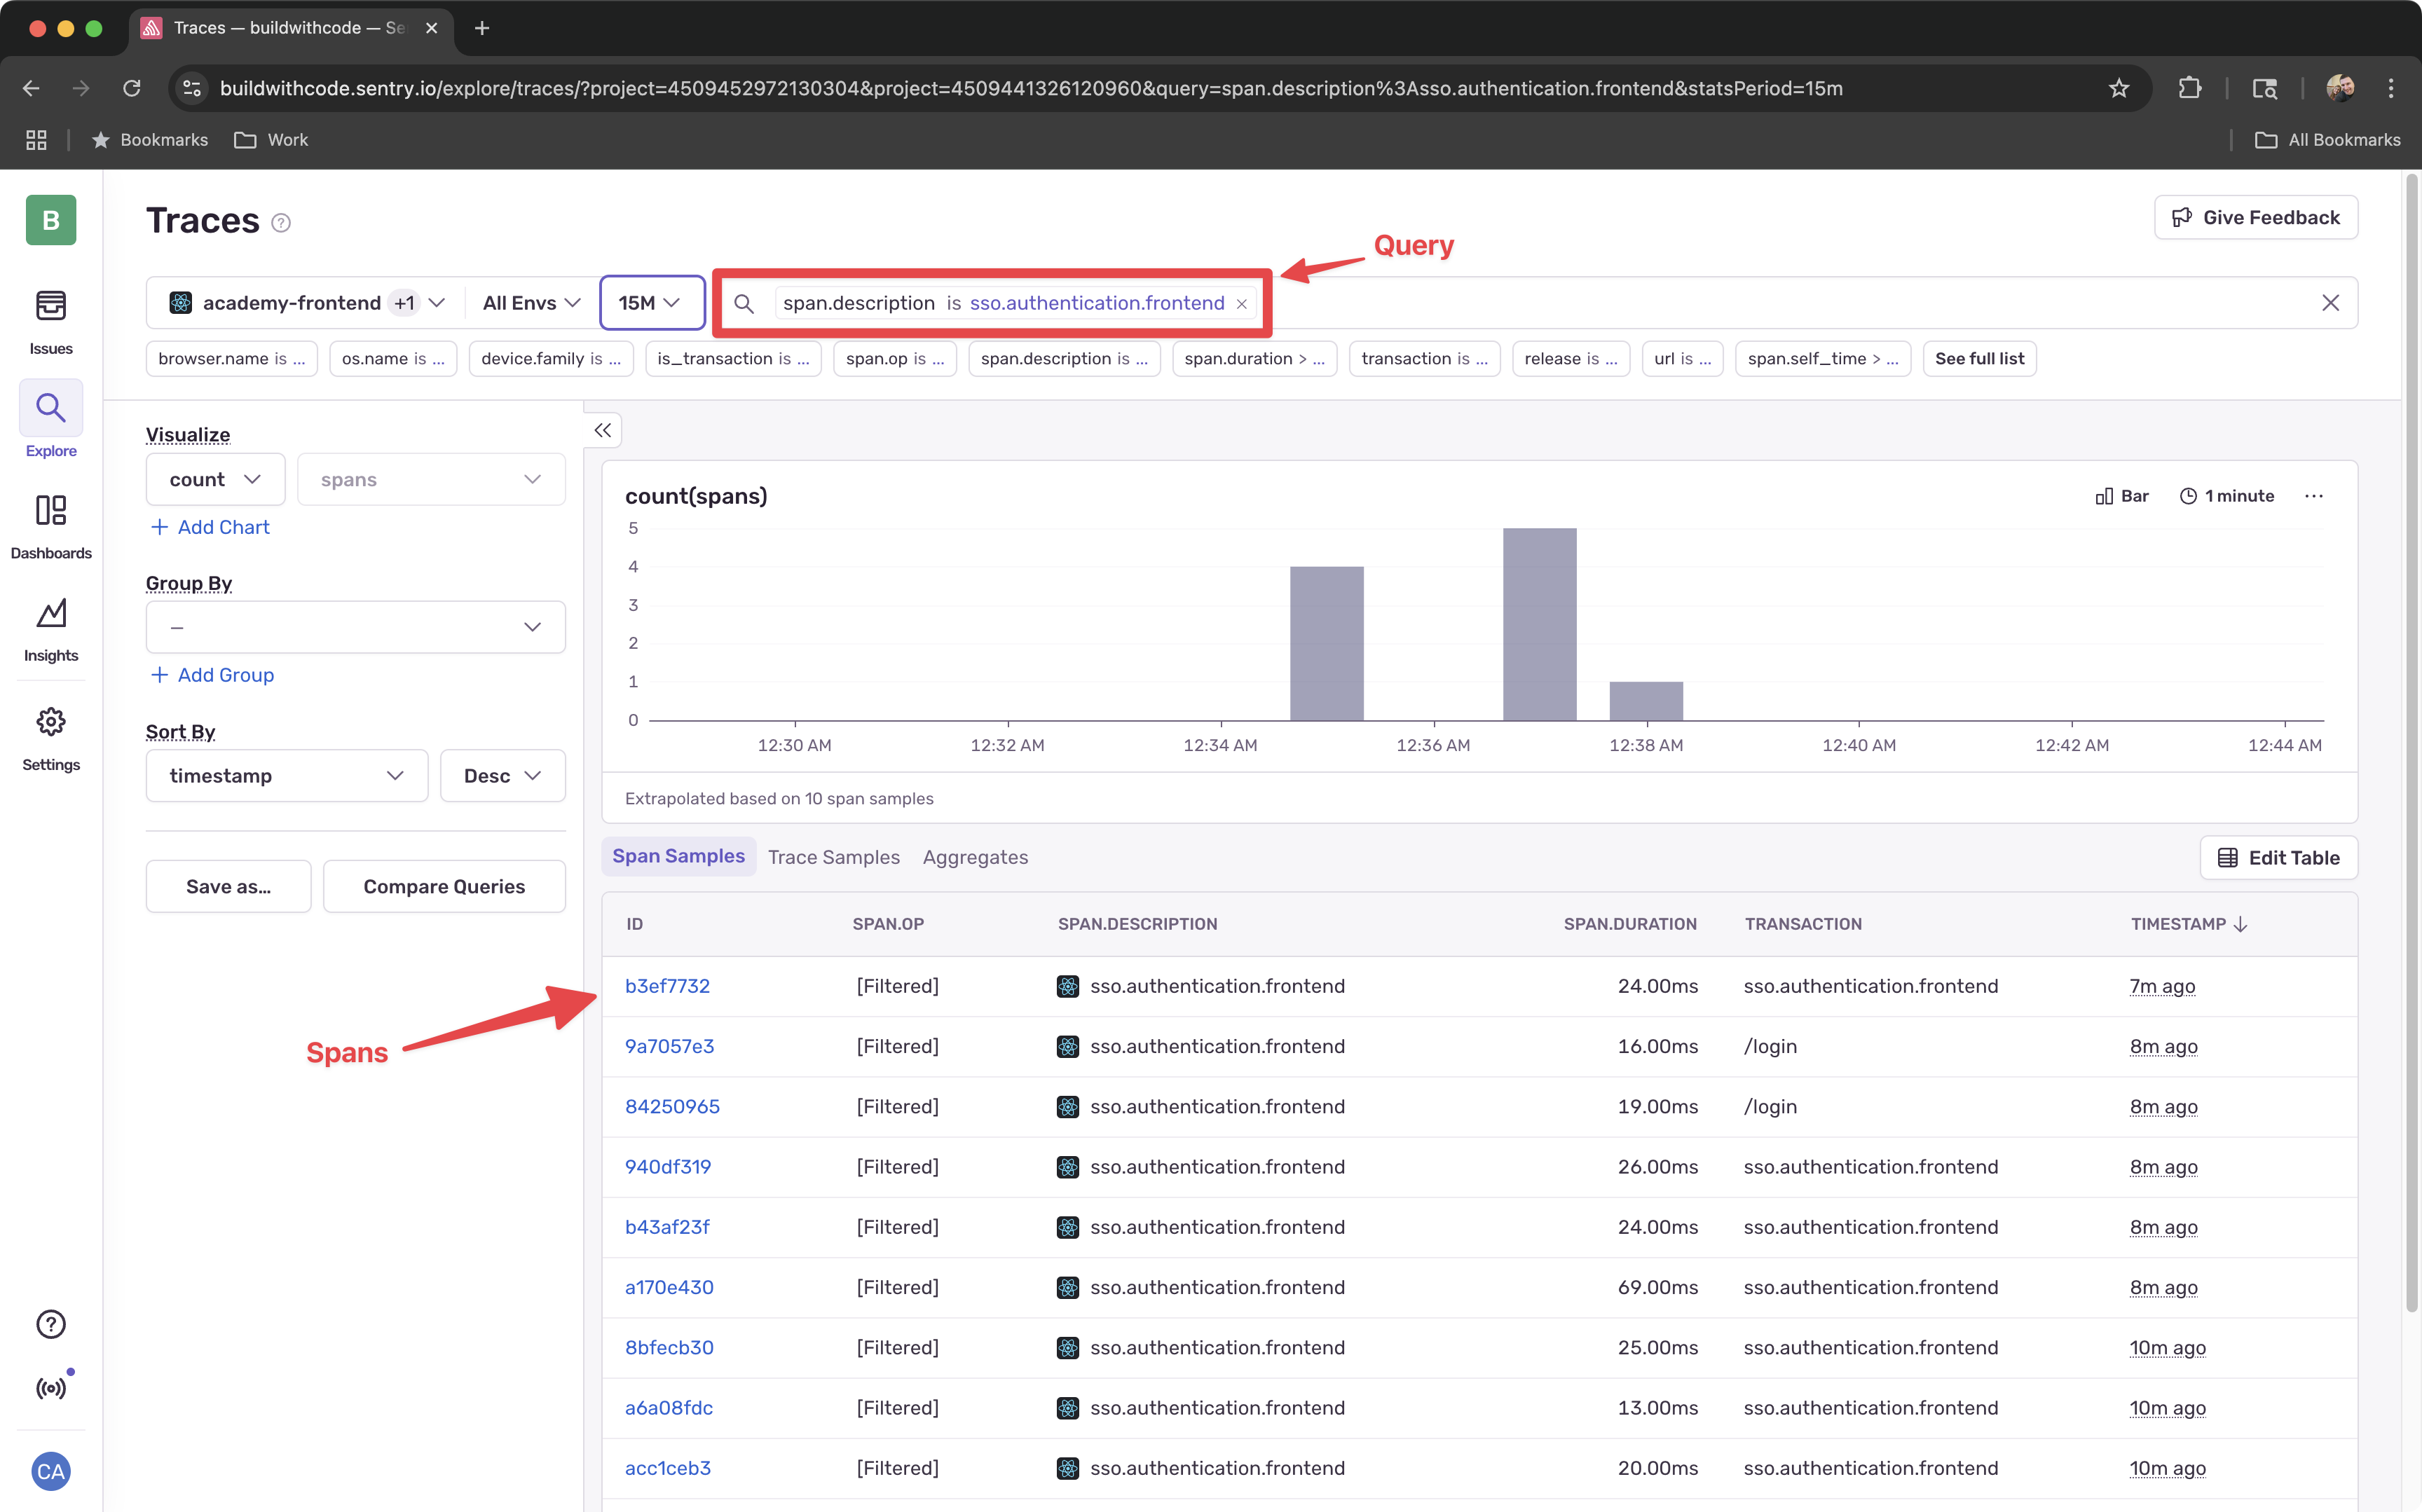
-
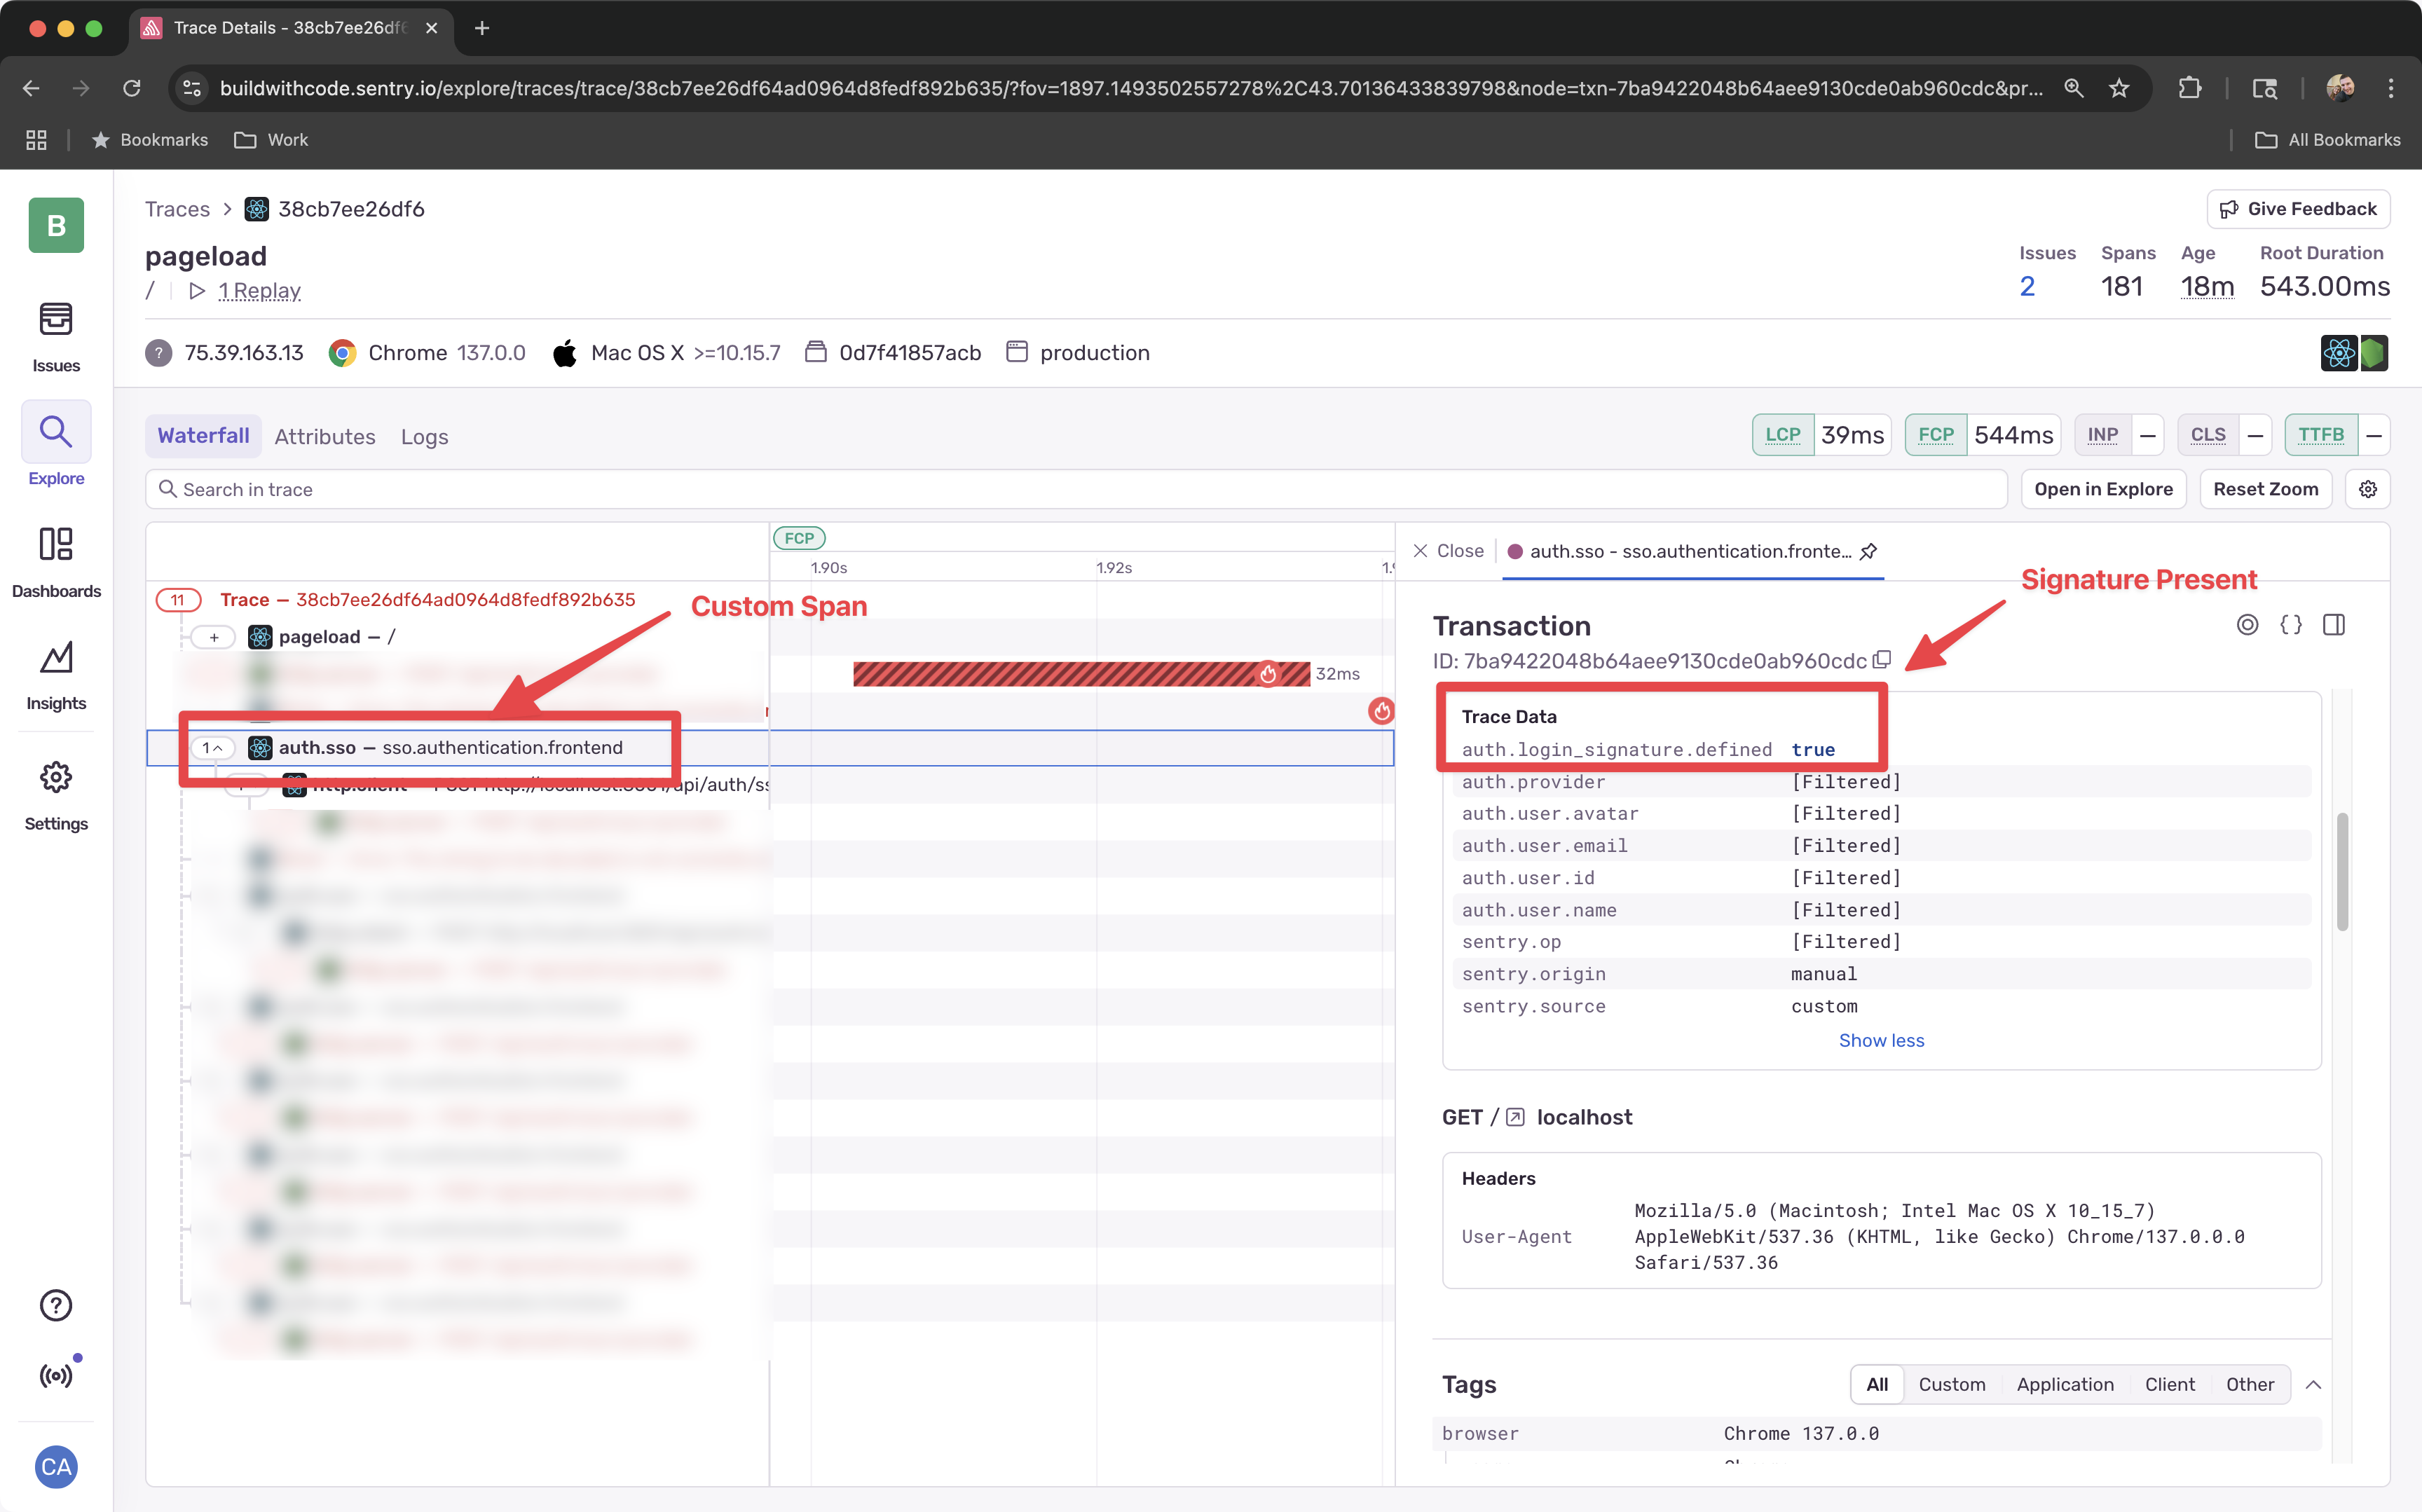
Examine the Trace
Clicking into one of the spans will show you the trace waterfall where you can examine the properties of any of he spans submitted.
-
Examine the Logs
Check the Explore > Logs tab for the log entries created by
logger.infoandlogger.errorcalls.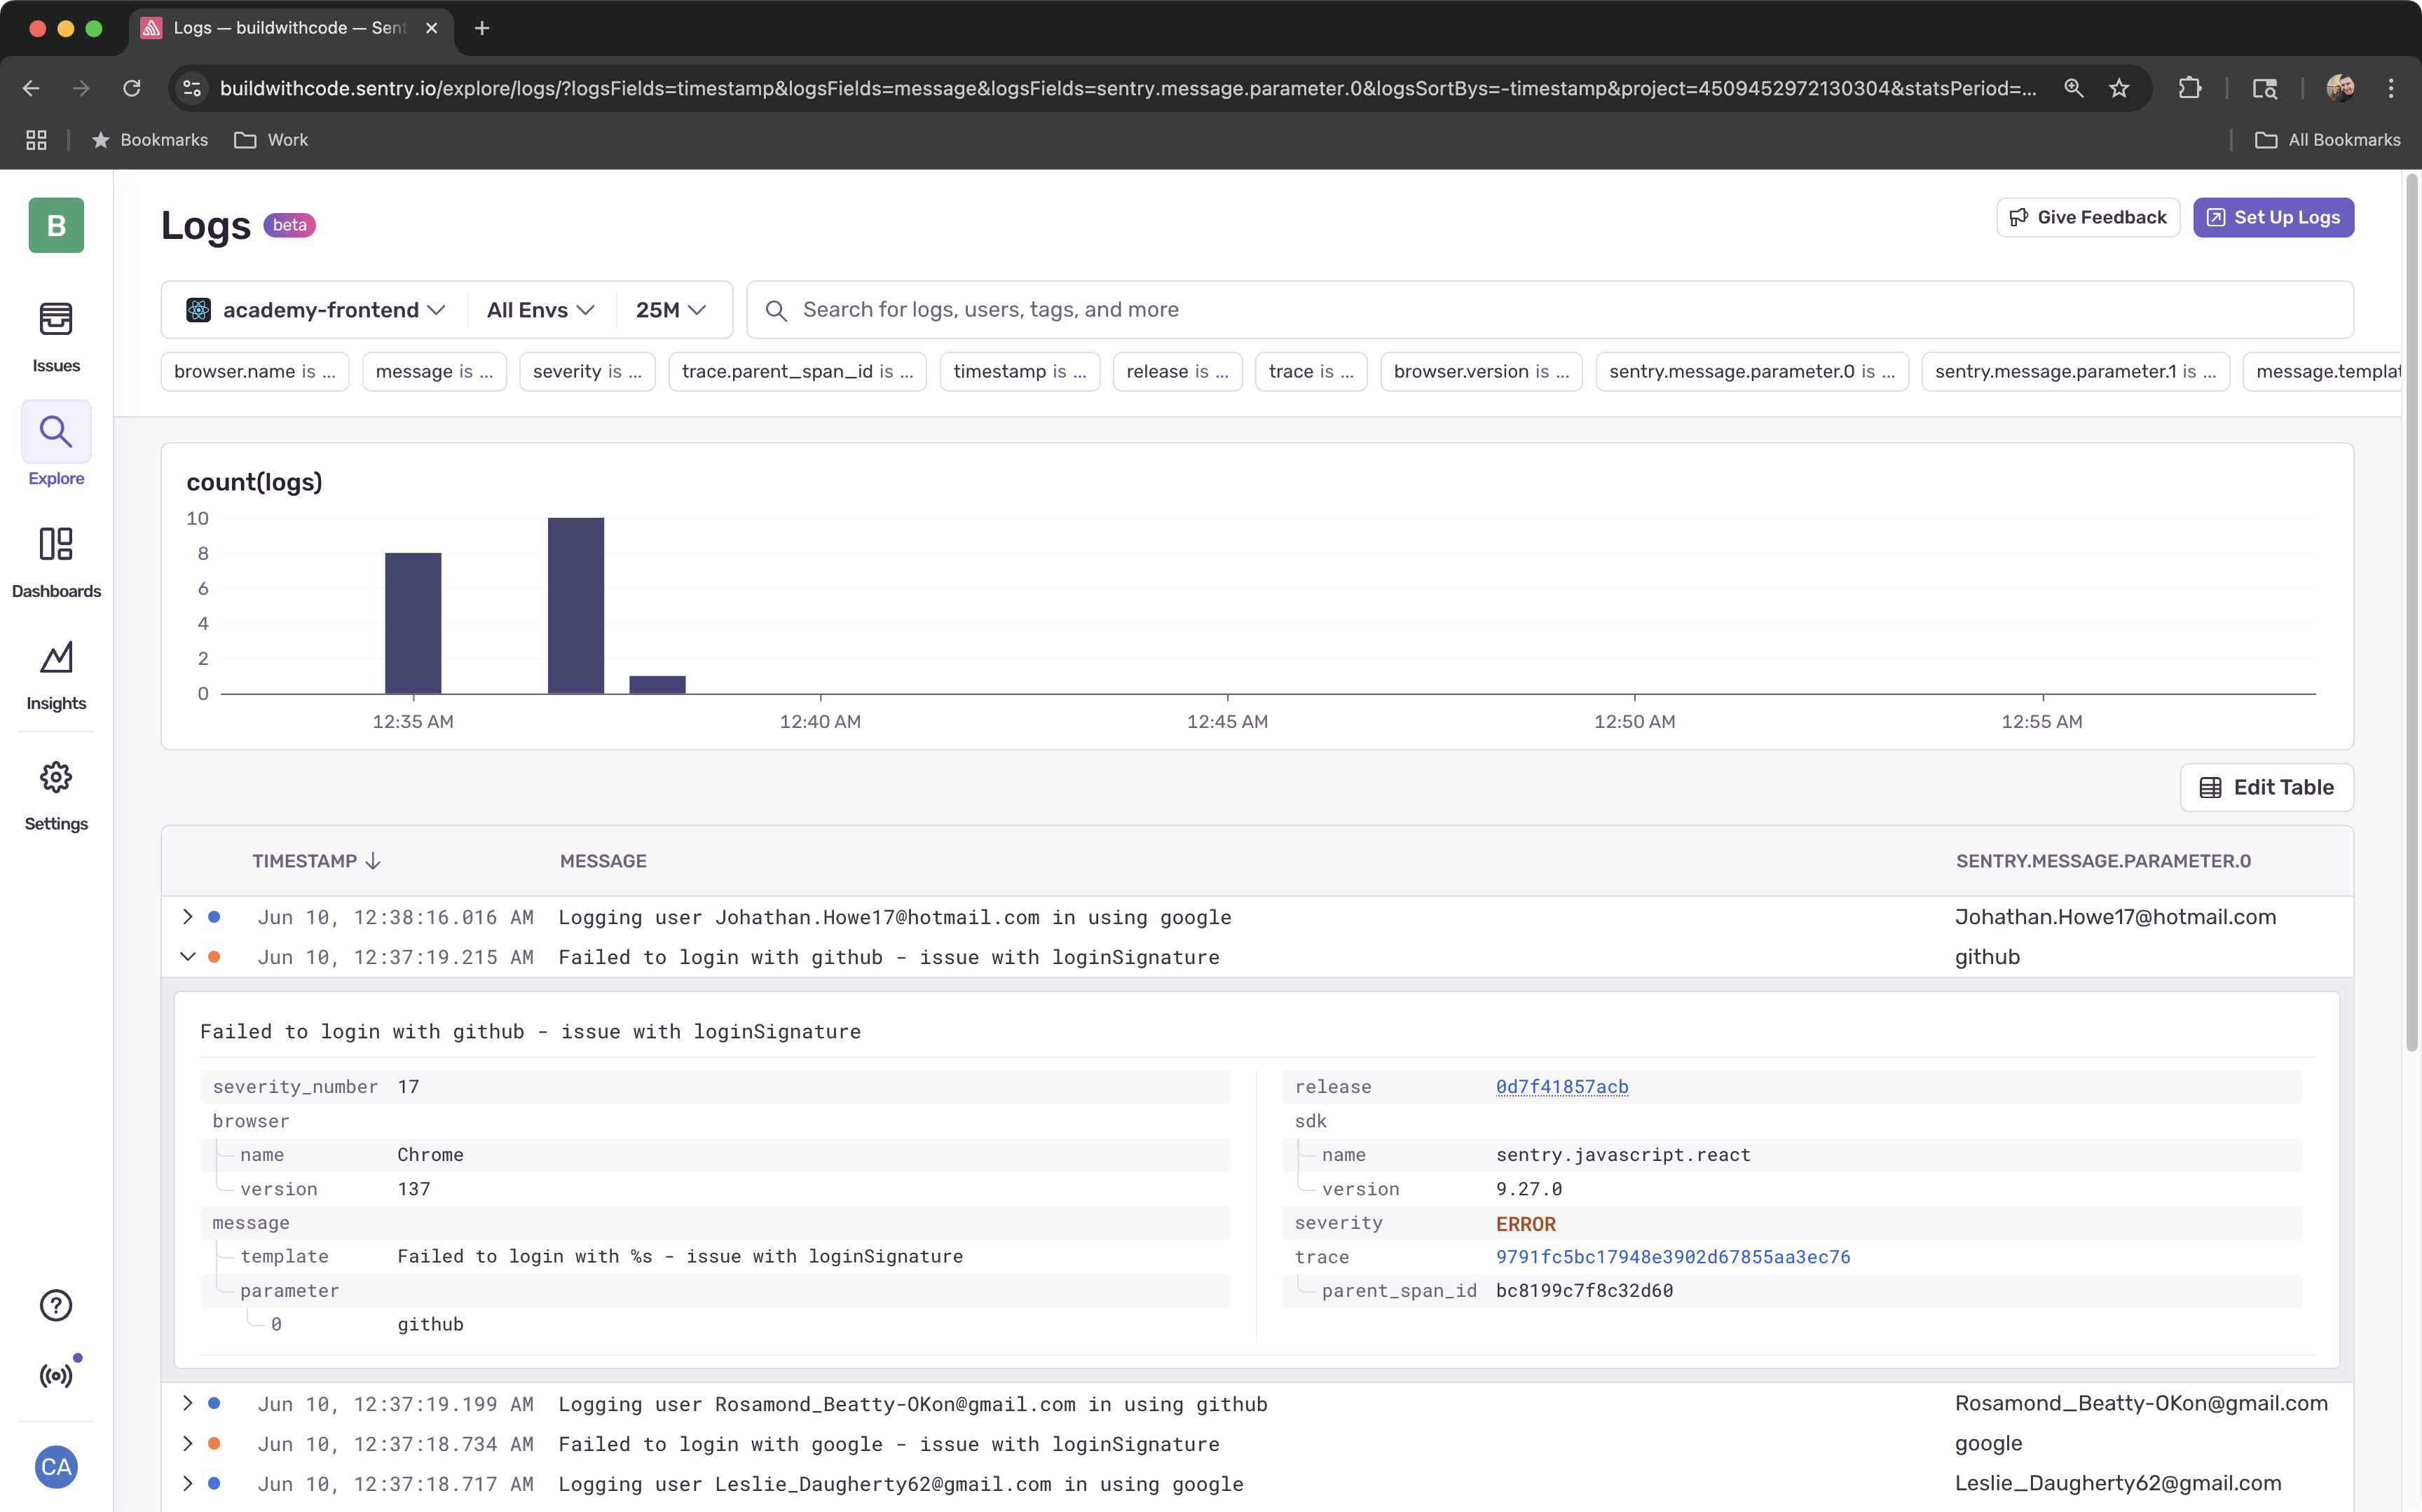
Backend Implementation
Now let’s instrument the backend authentication flow to trace the server-side processing and identify where the issue occurs.
-
Add Sentry Import to Backend Auth Routes
Navigate to the
/apps/server/modules/auth/routes.tsfile and add the Sentry import at the top:import * as Sentry from '@sentry/node'; -
Set Up Backend Logging
Add the logger destructuring after your imports:
const { logger } = Sentry; -
Replace the Complete SSO Route
Replace the entire
authRoutes.post('/sso/:provider'route with this instrumented version:authRoutes.post('/sso/:provider', async (req, res) => {try {const { provider } = req.params;const { loginSignature } = req.body;await Sentry.startSpan({name: 'sso.authentication.server',op: 'auth.sso.verify',attributes: {'auth.provider': provider,'auth.login_signature.provided': !!loginSignature,'http.method': req.method,'http.route': '/sso/:provider',},},async (span) => {logger.info(logger.fmt`SSO login attempt with ${provider}`);logger.info(logger.fmt`Login signature provided: ${!!loginSignature}`);// Add more attributes based on request dataspan.setAttributes({'auth.request.body_size': JSON.stringify(req.body).length,'auth.request.has_signature': loginSignature !== undefined,});// TOFIX Module 1: SSO Login with missing login signatureconst signaturePayload = JSON.parse(atob(loginSignature)); // This will throw when loginSignature is undefined// Add signature payload details to spanspan.setAttributes({'auth.signature.user_id': signaturePayload.sub || null,'auth.signature.email': signaturePayload.email || null,'auth.signature.name': signaturePayload.name || null,'auth.signature.provider': signaturePayload.provider || null,'auth.signature.issued_at': signaturePayload.iat || null,'auth.signature.expires_at': signaturePayload.exp || null,'auth.signature.has_user_data': !!signaturePayload.userData,});// Use the rich fake user data from the signature payload, with sensible defaultsconst fakeUserData = signaturePayload.userData || {};// Add user data details to spanspan.setAttributes({'auth.user.id': fakeUserData.id || null,'auth.user.email': fakeUserData.email || null,'auth.user.name': fakeUserData.name || null,'auth.user.company': fakeUserData.company || null,'auth.user.job_title': fakeUserData.jobTitle || null,});const ssoUser = {id: fakeUserData.id || createId(),email: fakeUserData.email || `${provider}.user@example.com`,name:fakeUserData.name ||`${provider.charAt(0).toUpperCase() + provider.slice(1)} User`,firstName: fakeUserData.firstName || 'Demo',lastName: fakeUserData.lastName || 'User',username: fakeUserData.username || 'demo.user',avatar:fakeUserData.avatar ||'https://images.pexels.com/photos/220453/pexels-photo-220453.jpeg',company: fakeUserData.company || 'Demo Company',jobTitle: fakeUserData.jobTitle || 'Software Developer',phone: fakeUserData.phone || '+1-555-0123',workEmail: fakeUserData.workEmail || fakeUserData.email,role: 'student',provider: provider,signatureClaims: {sub: signaturePayload.sub,exp: signaturePayload.exp,metadata: {permissions: [],roles: [],},},socialProfile: {profileImage:fakeUserData.avatar ||'https://images.pexels.com/photos/220453/pexels-photo-220453.jpeg',verified: true,provider: provider,},linkedAccounts: [{provider: provider,externalId: signaturePayload.sub,profile: {username:fakeUserData.username ||(fakeUserData.email ||signaturePayload.email ||'user').split('@')[0],avatar:fakeUserData.avatar ||'https://images.pexels.com/photos/220453/pexels-photo-220453.jpeg',},},],};// Add final authentication result to spanspan.setAttributes({'auth.result.user_id': ssoUser.id,'auth.result.success': true,'auth.result.provider_verified': true,});const responseData = {user: ssoUser,token: `sso-token-${createId()}`,expiresIn: '24h',};logger.info(logger.fmt`Successful SSO login with ${provider}`);res.json(responseData);});} catch (error: any) {Sentry.captureException(error, {tags: {operation: 'sso.authentication.backend',provider: req.params.provider,},extra: {provider: req.params.provider,hasLoginSignature: !!req.body.loginSignature,requestBody: req.body,},});logger.error(logger.fmt`SSO login error for ${req.params.provider}:`,error);throw error;}}); -
Test Backend Tracing
Try logging in again and observe the trace and logs by viewing the Explore > Traces and using the Trace Explorer to search for
sso.authentication.server.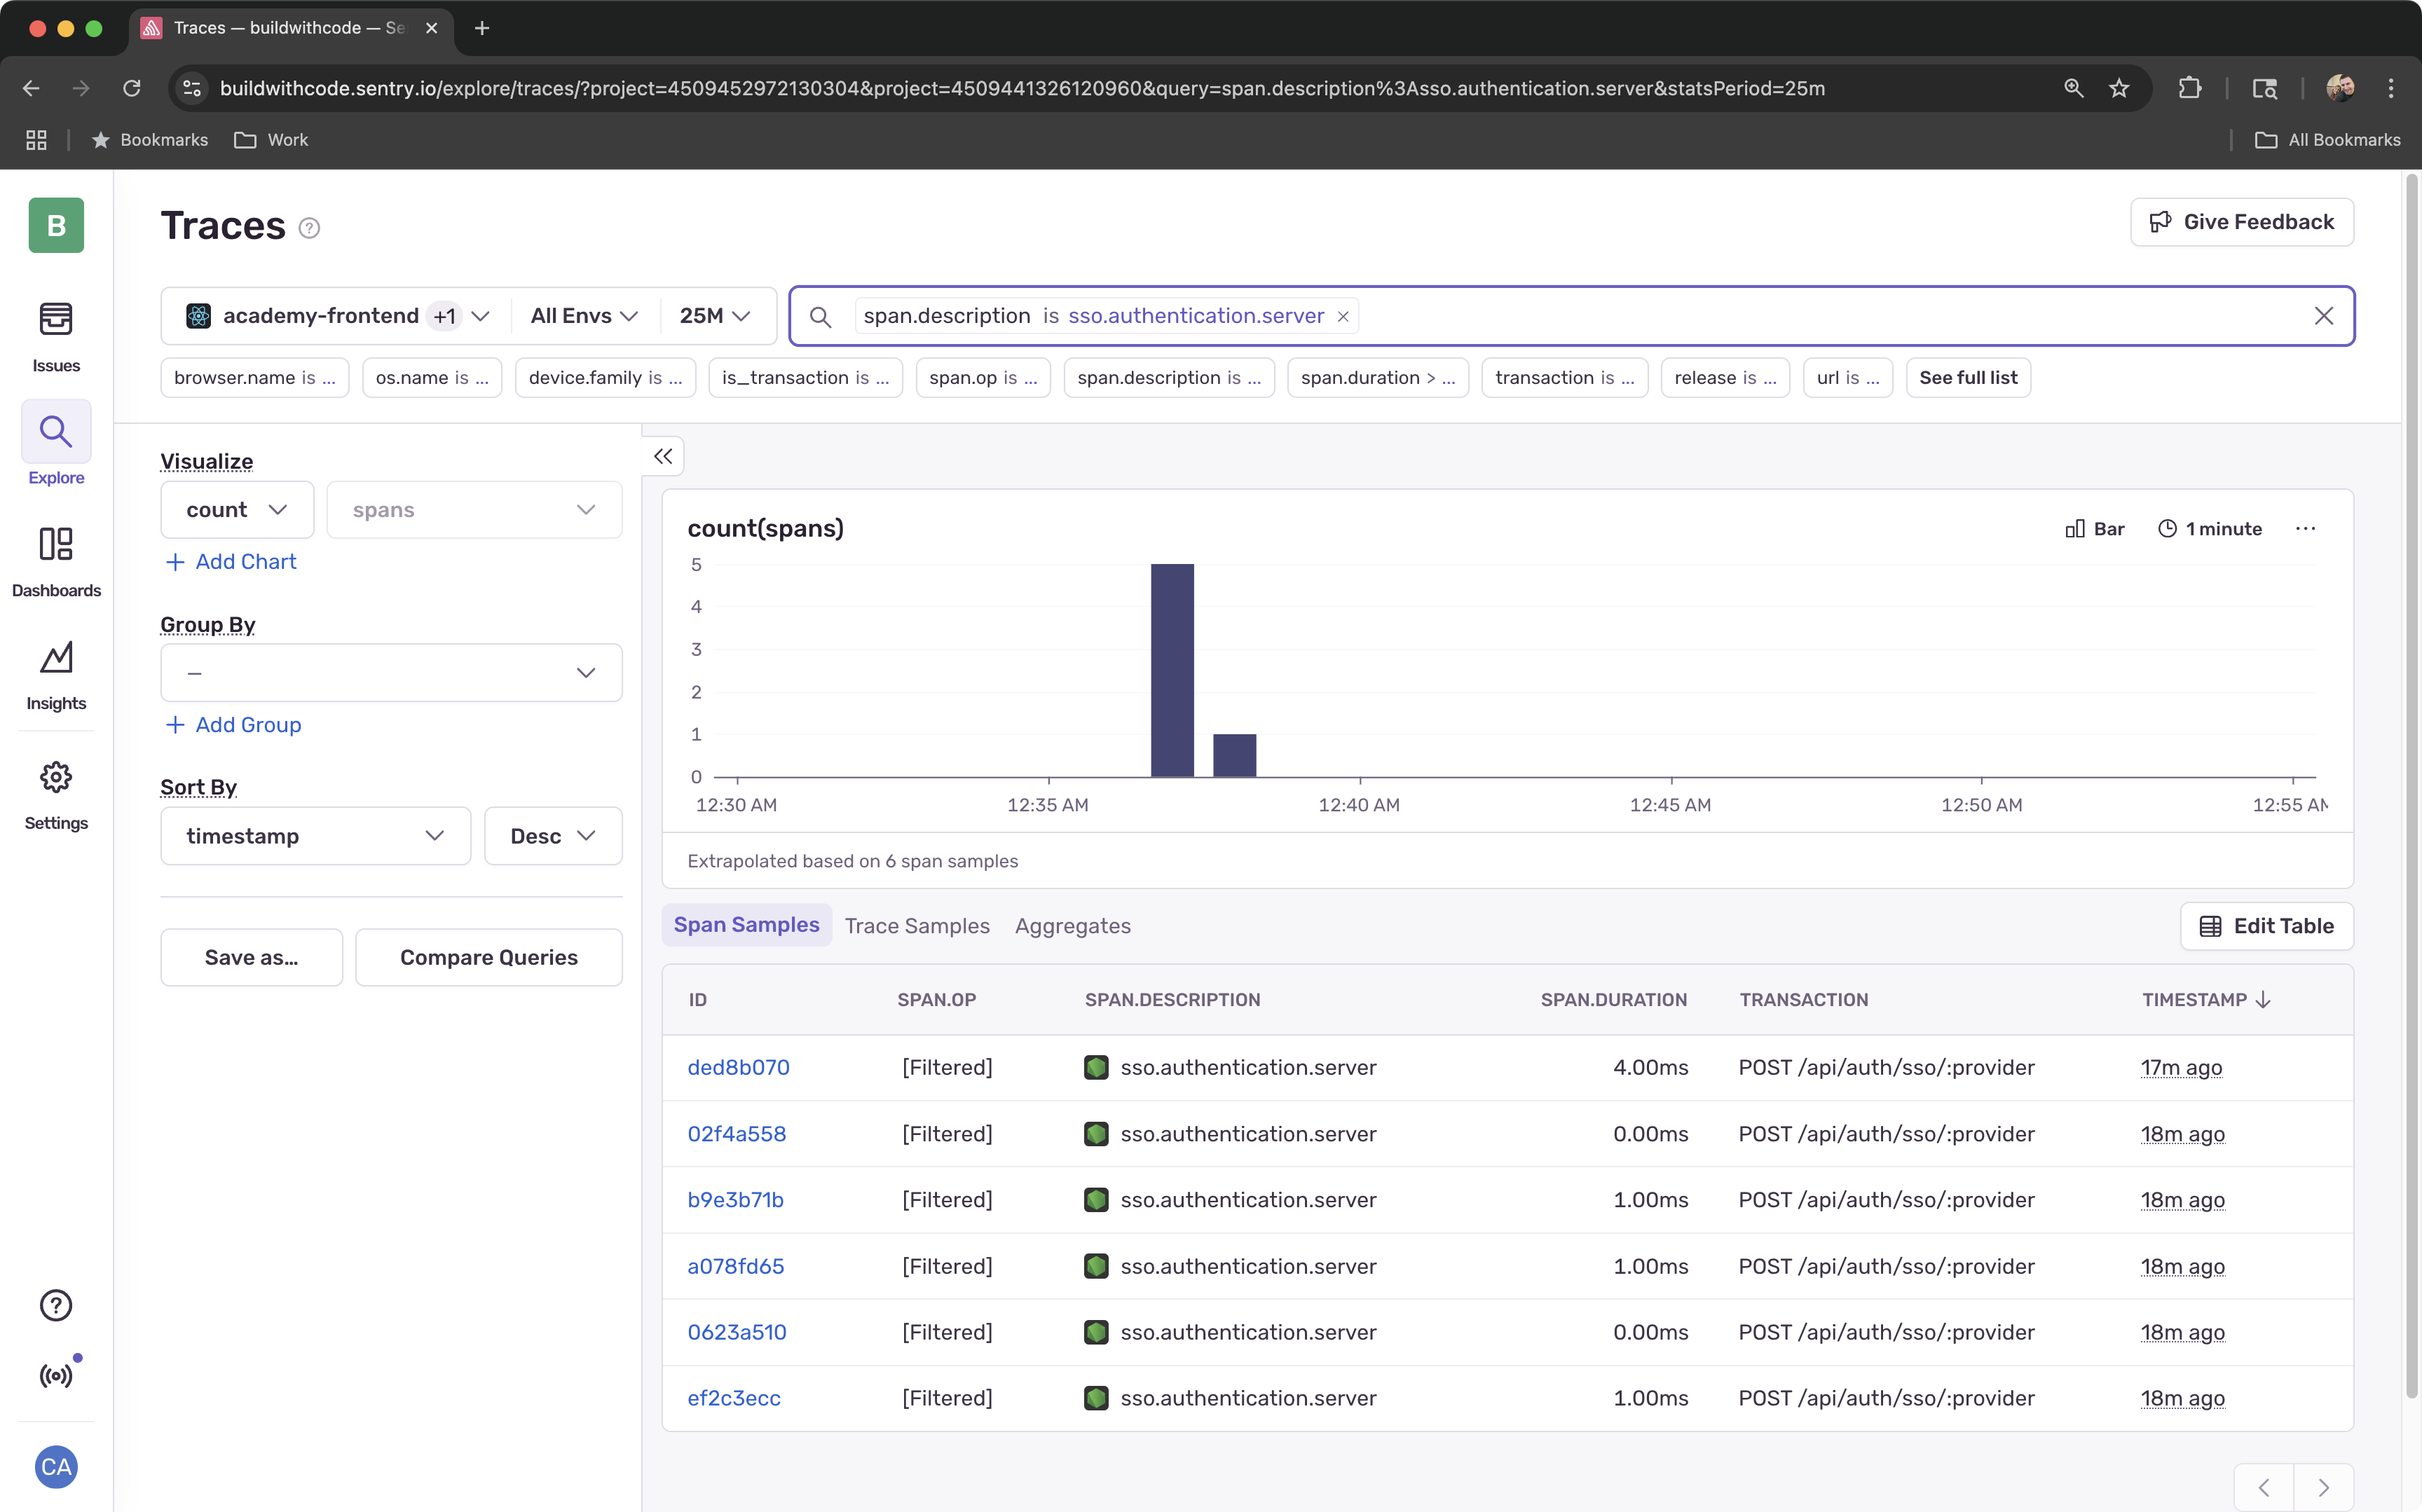
-
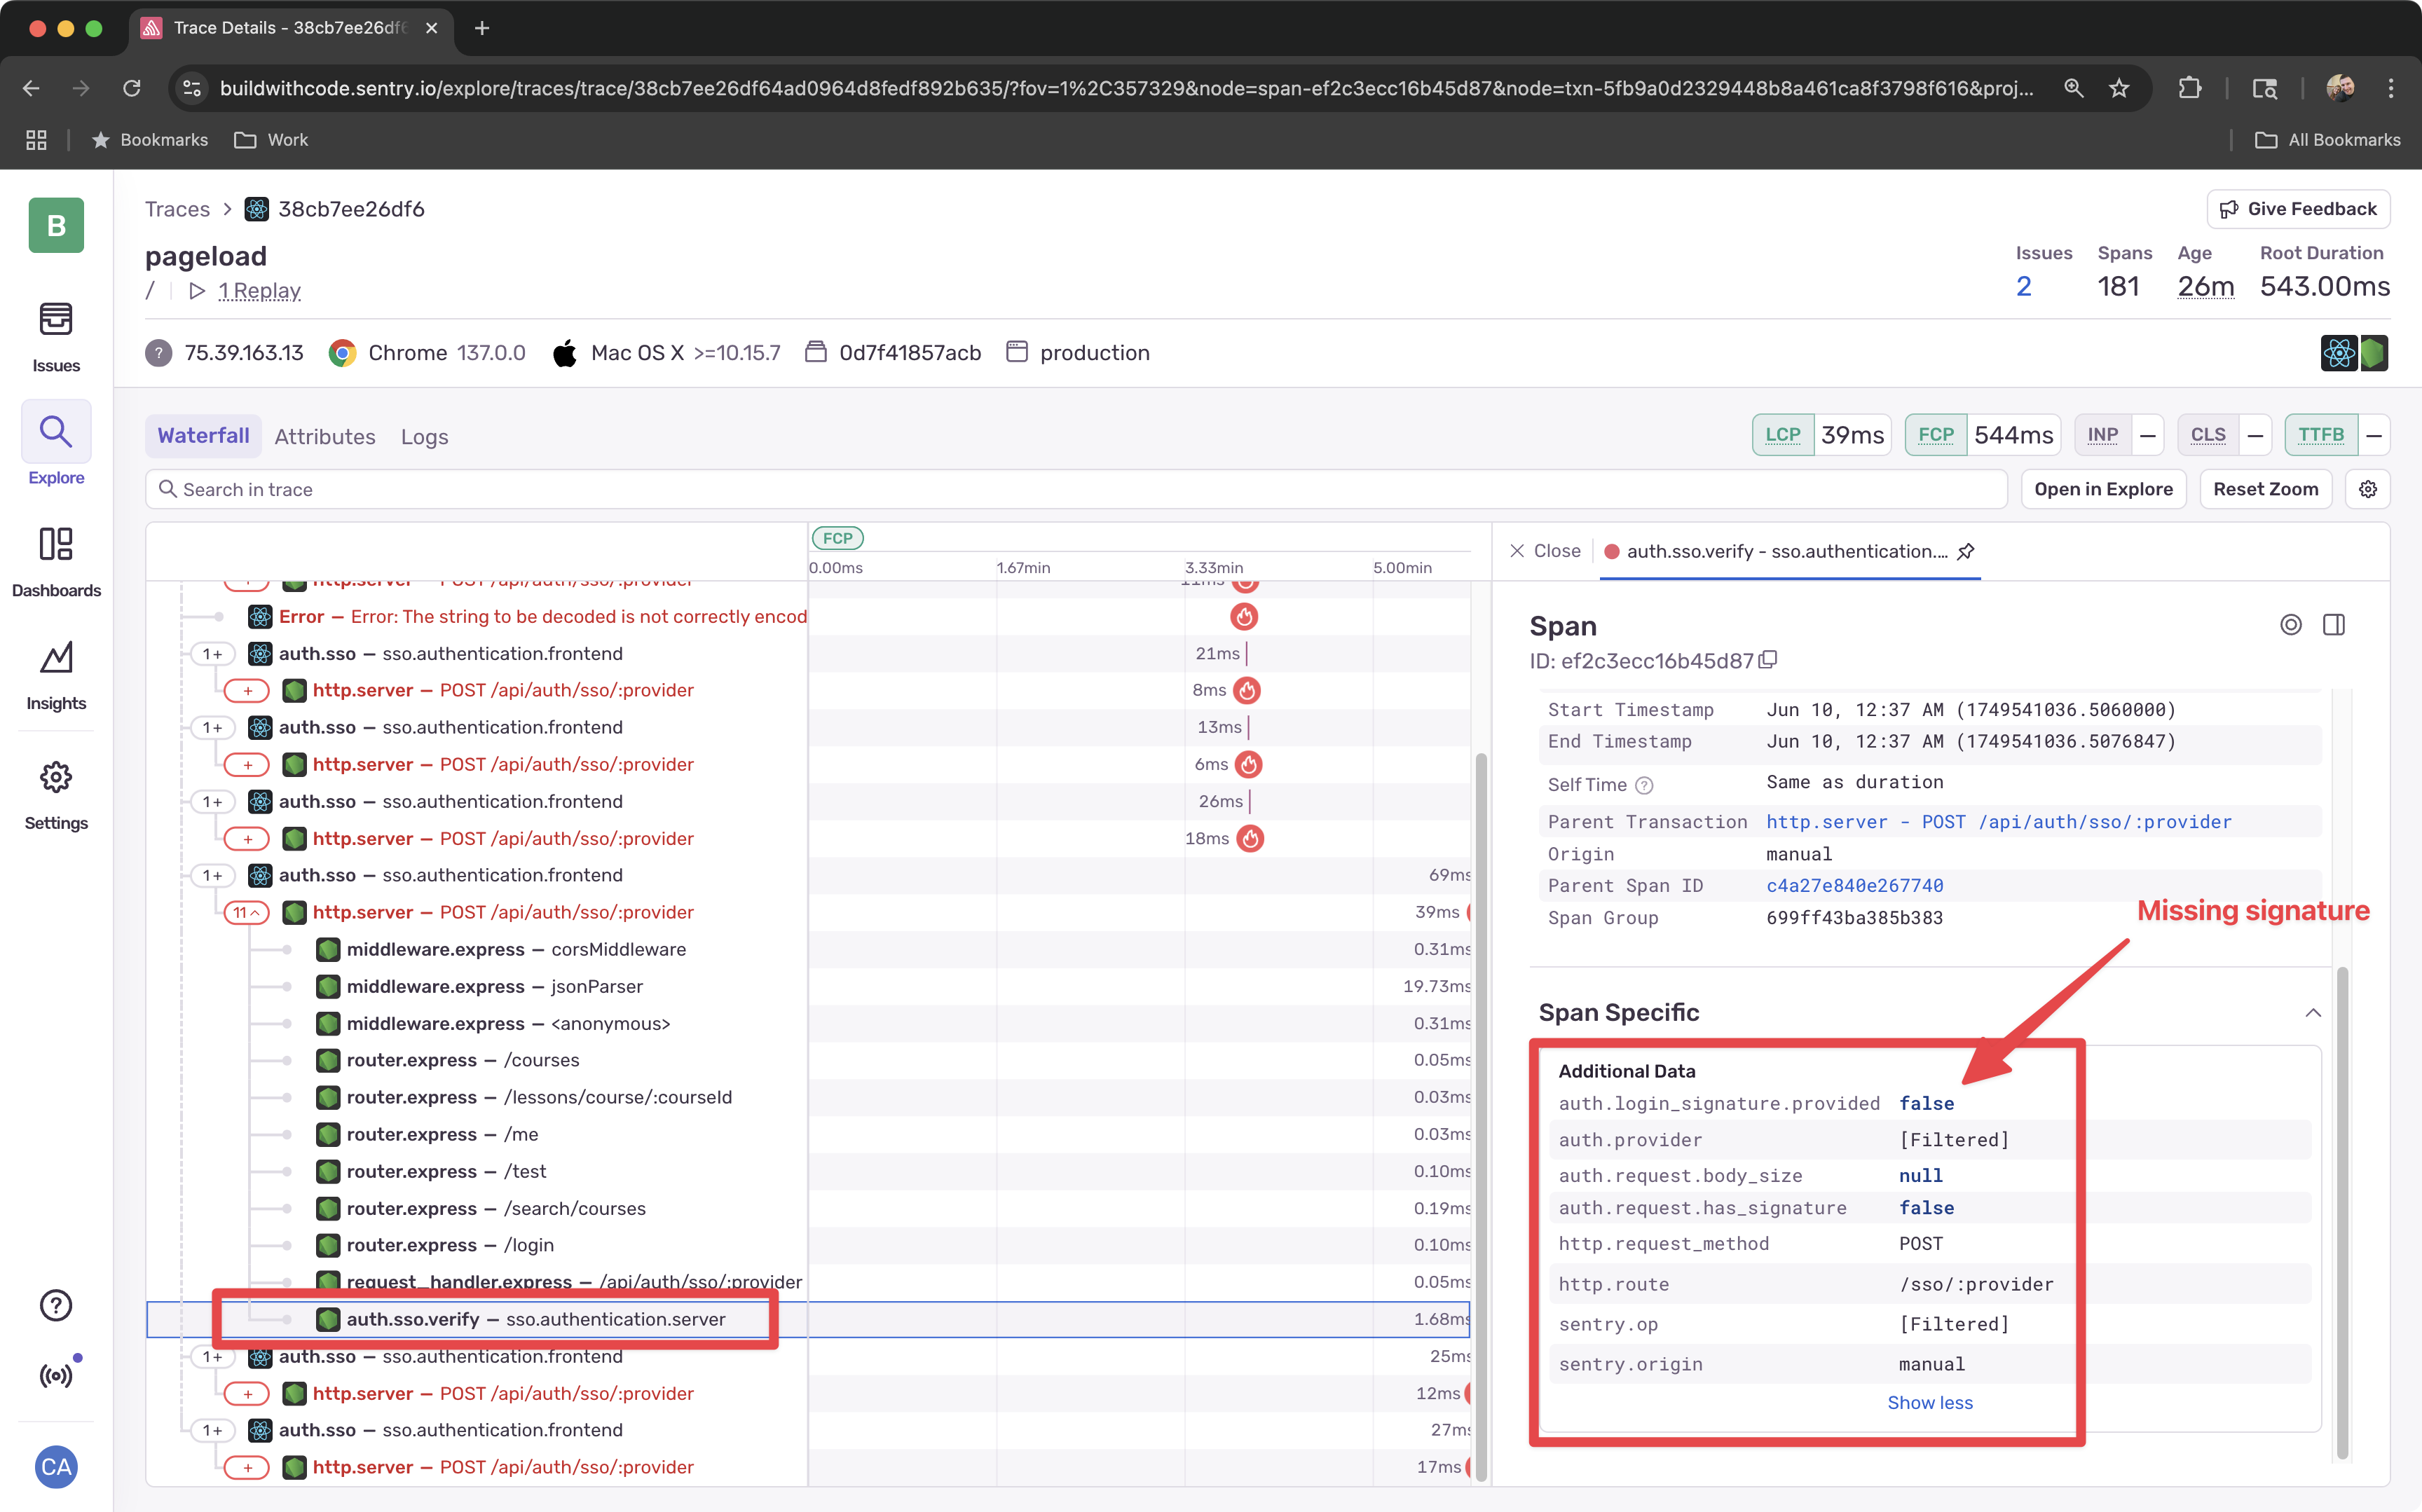
Examine the Trace
Clicking into one of the spans will show you the trace waterfall where you can examine the properties of any of he spans submitted.
-
Examine the Logs

You should now see the complete authentication flow traced from frontend to backend, and notice that the loginSignature is being created on the frontend but not being passed properly to the server.
When we explore these traces and logs, we can see an inconsistency - the loginSignature is being created on the frontend, but not being passed properly to the server.
A little help from Seer
Tracing and Logs have given us a lot of information about the issue and a pretty clear path on the things that need to be fixed - but it still took us manually digging into the results to find the issue.
What if we could have Sentry tell us exactly what broke, and where? Enter Seer, Sentry’s AI Agent for debugging.
Seer uses your codebase, traces, logs, and the stack traces in your application to understand better context about what’s going wrong in your application.
Instead of you having to manually dig through the results, Seer analyzes all of these sources and gives you a clear path to the issue.
-
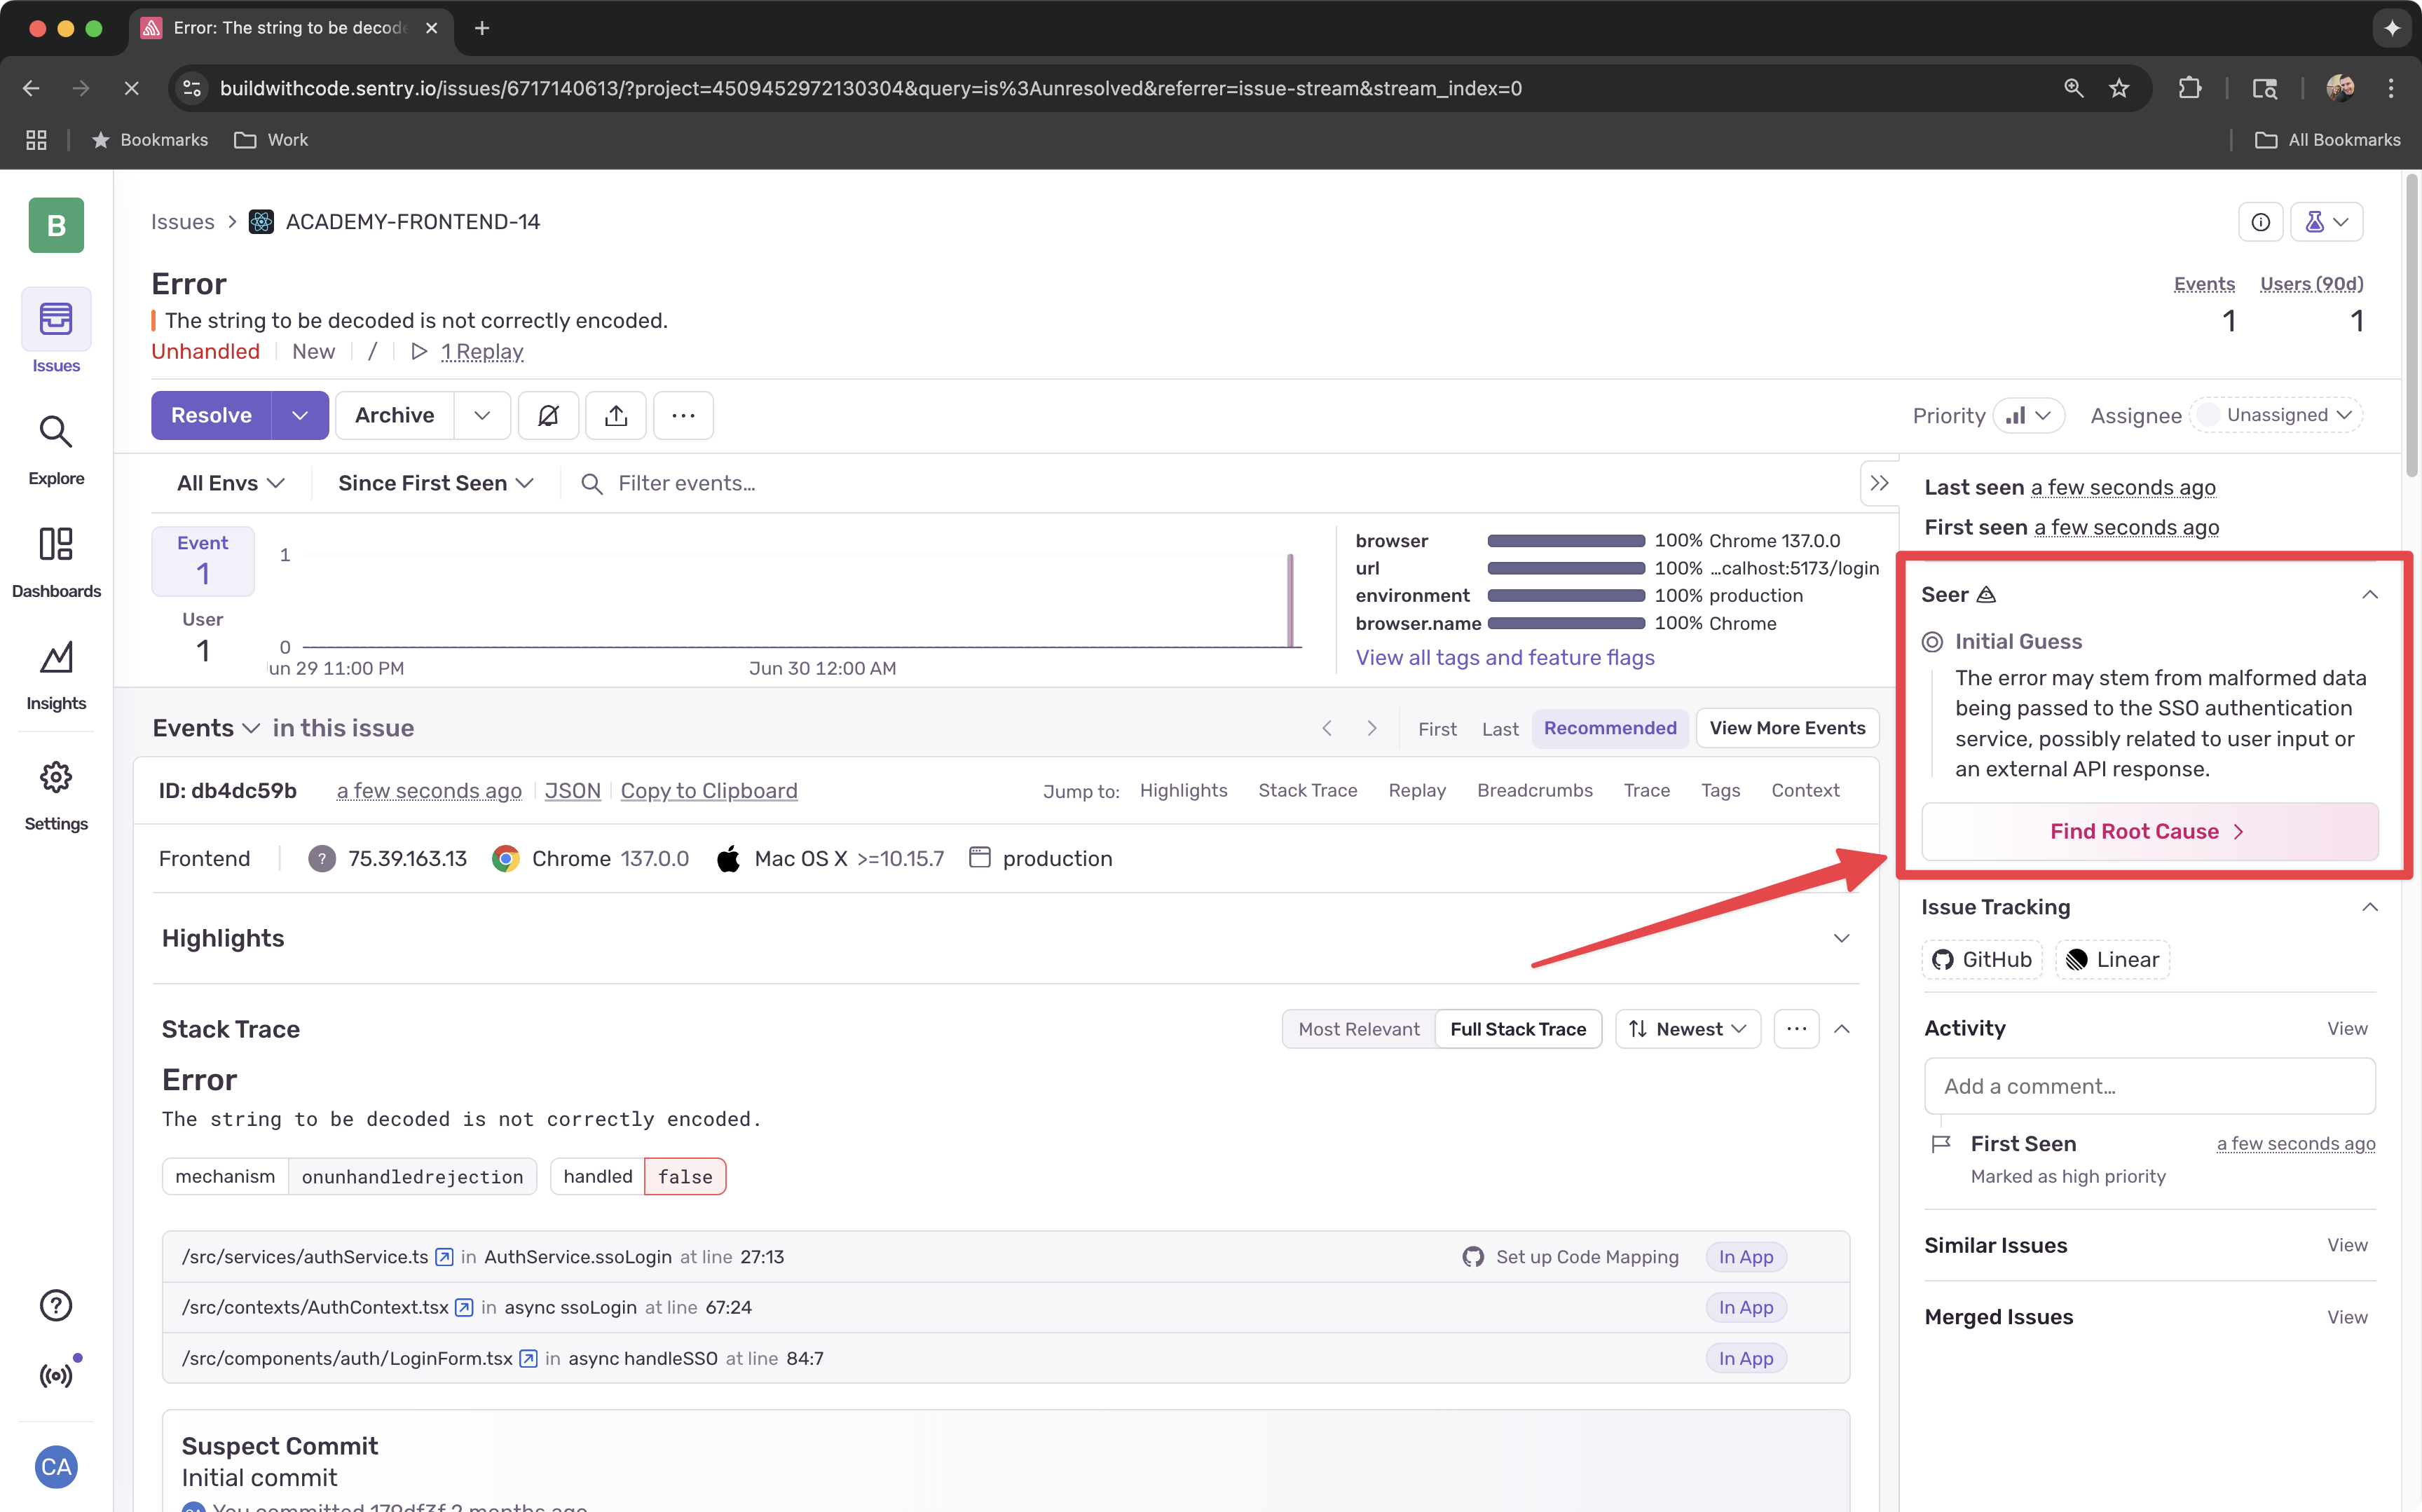
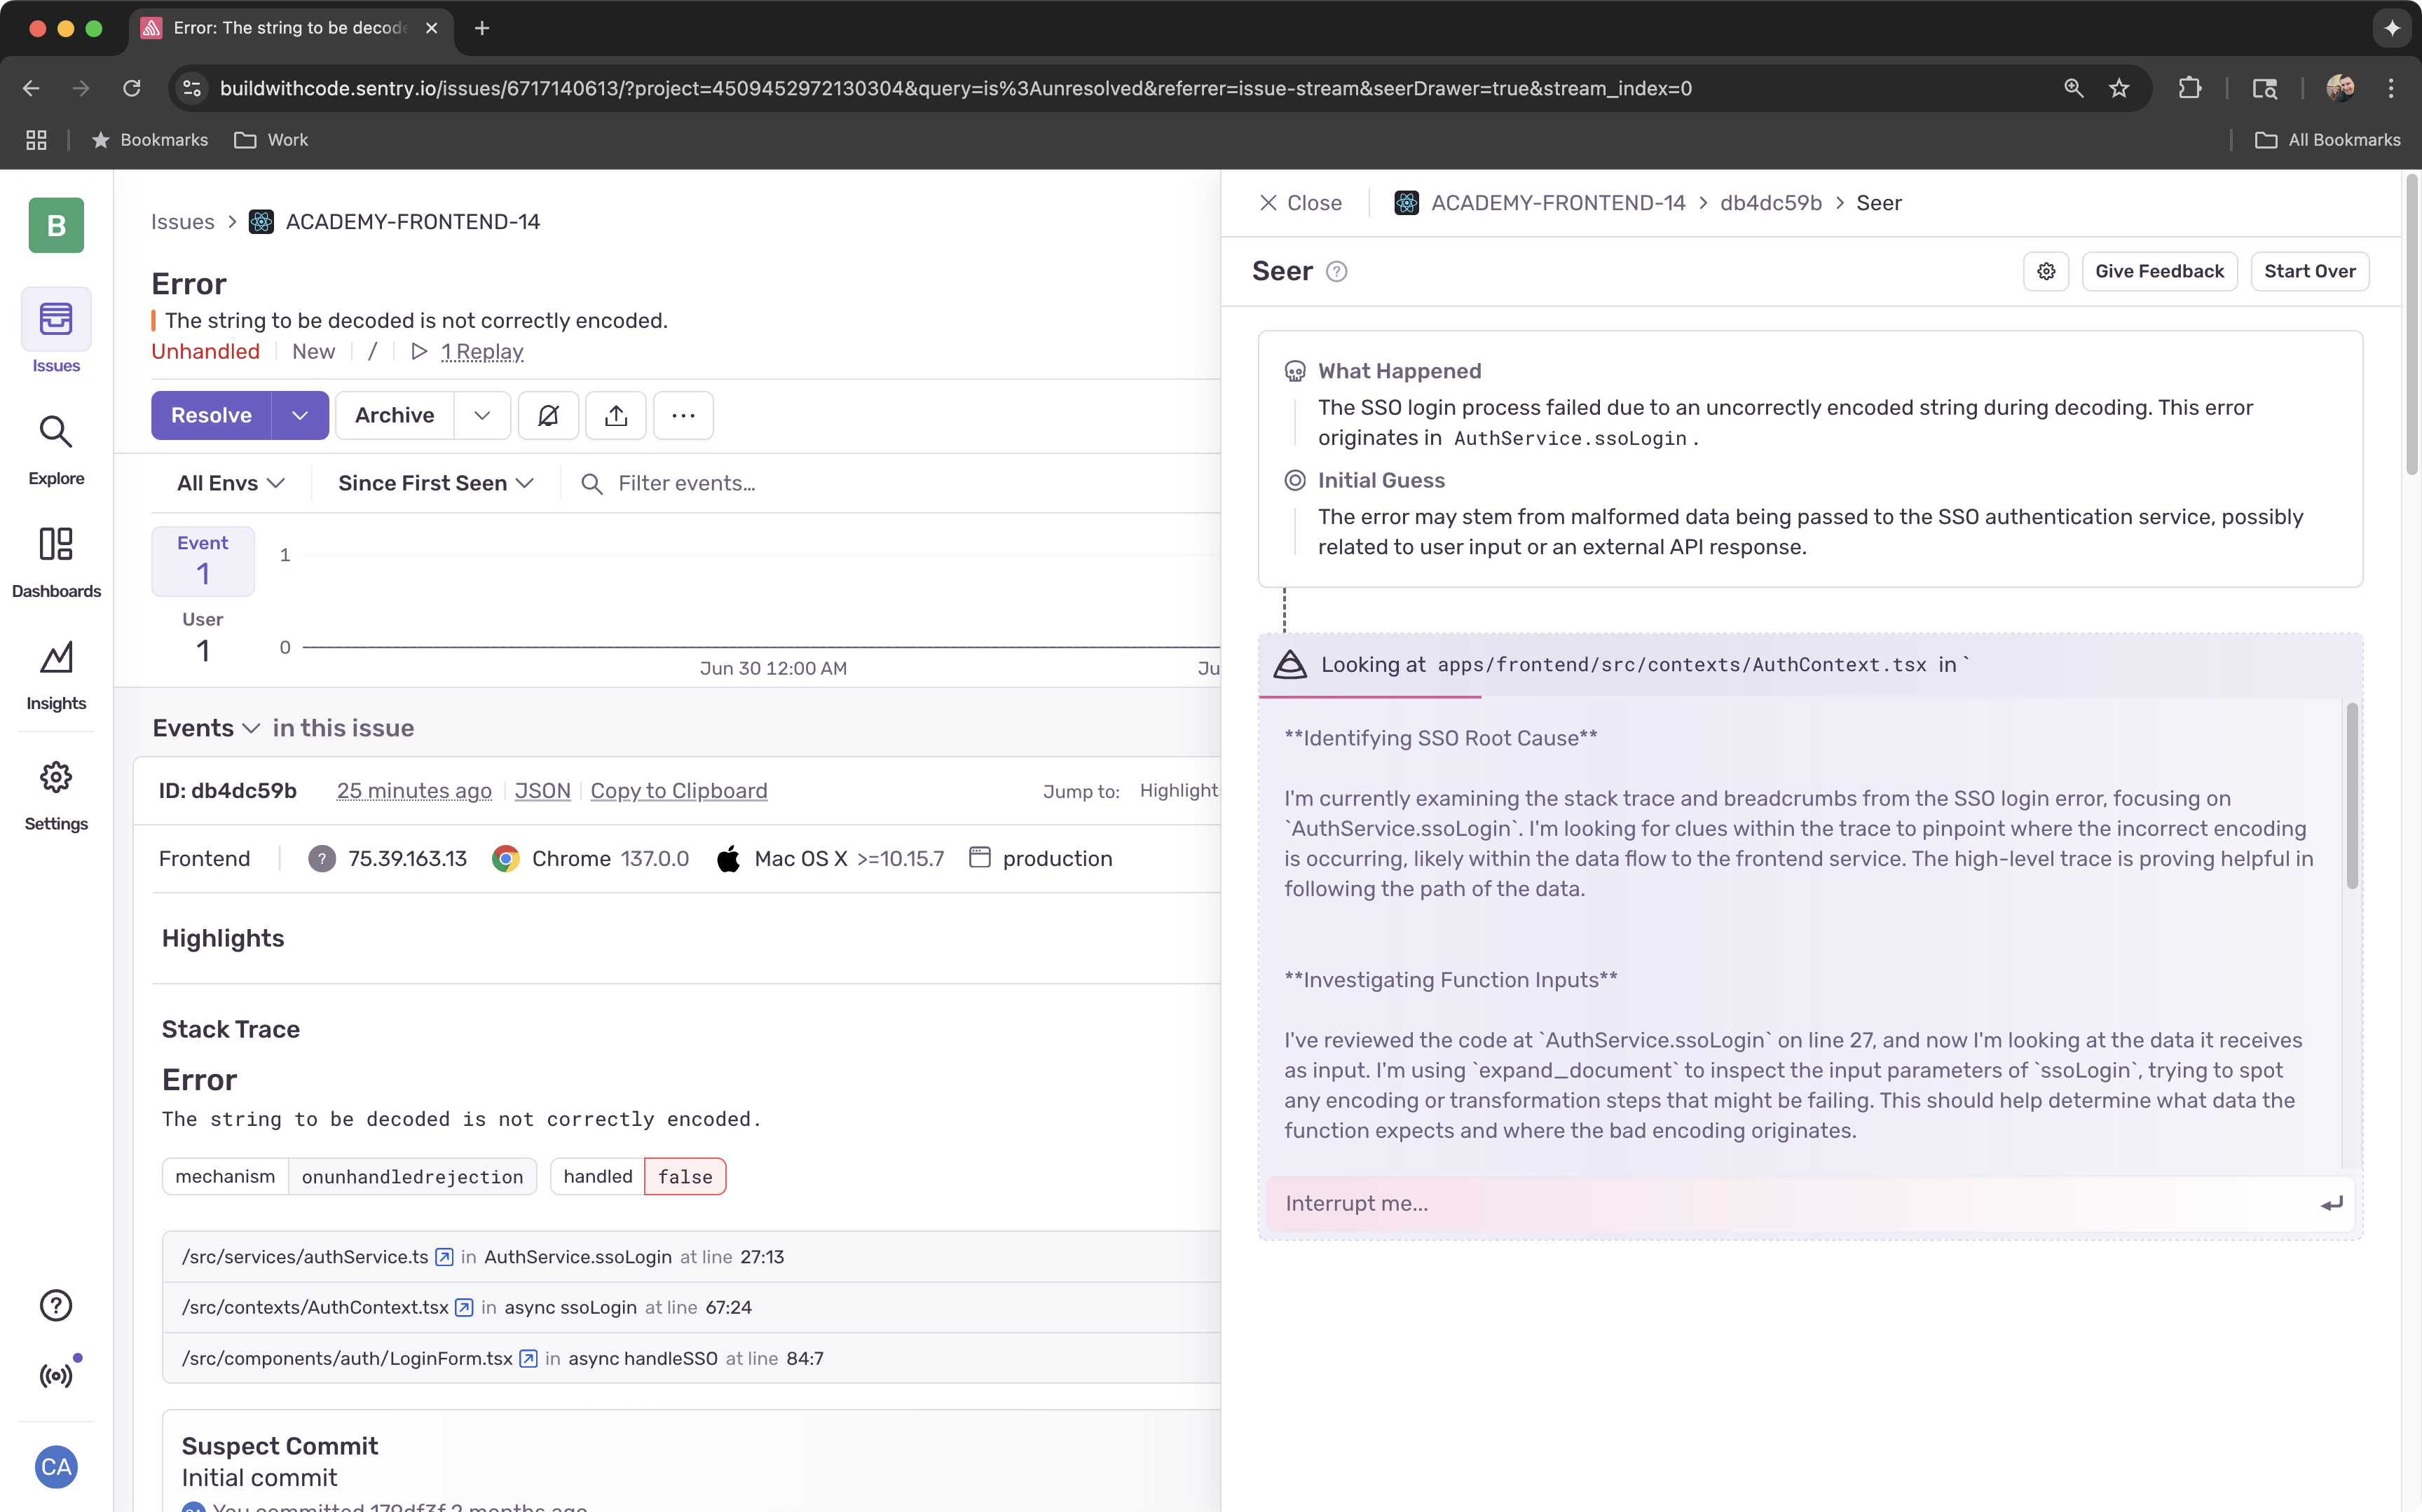
Click Find Root Cause
This opens the Seer modal and gives you a high level of of what’s happening and the initial guess over what might be wrong.
-
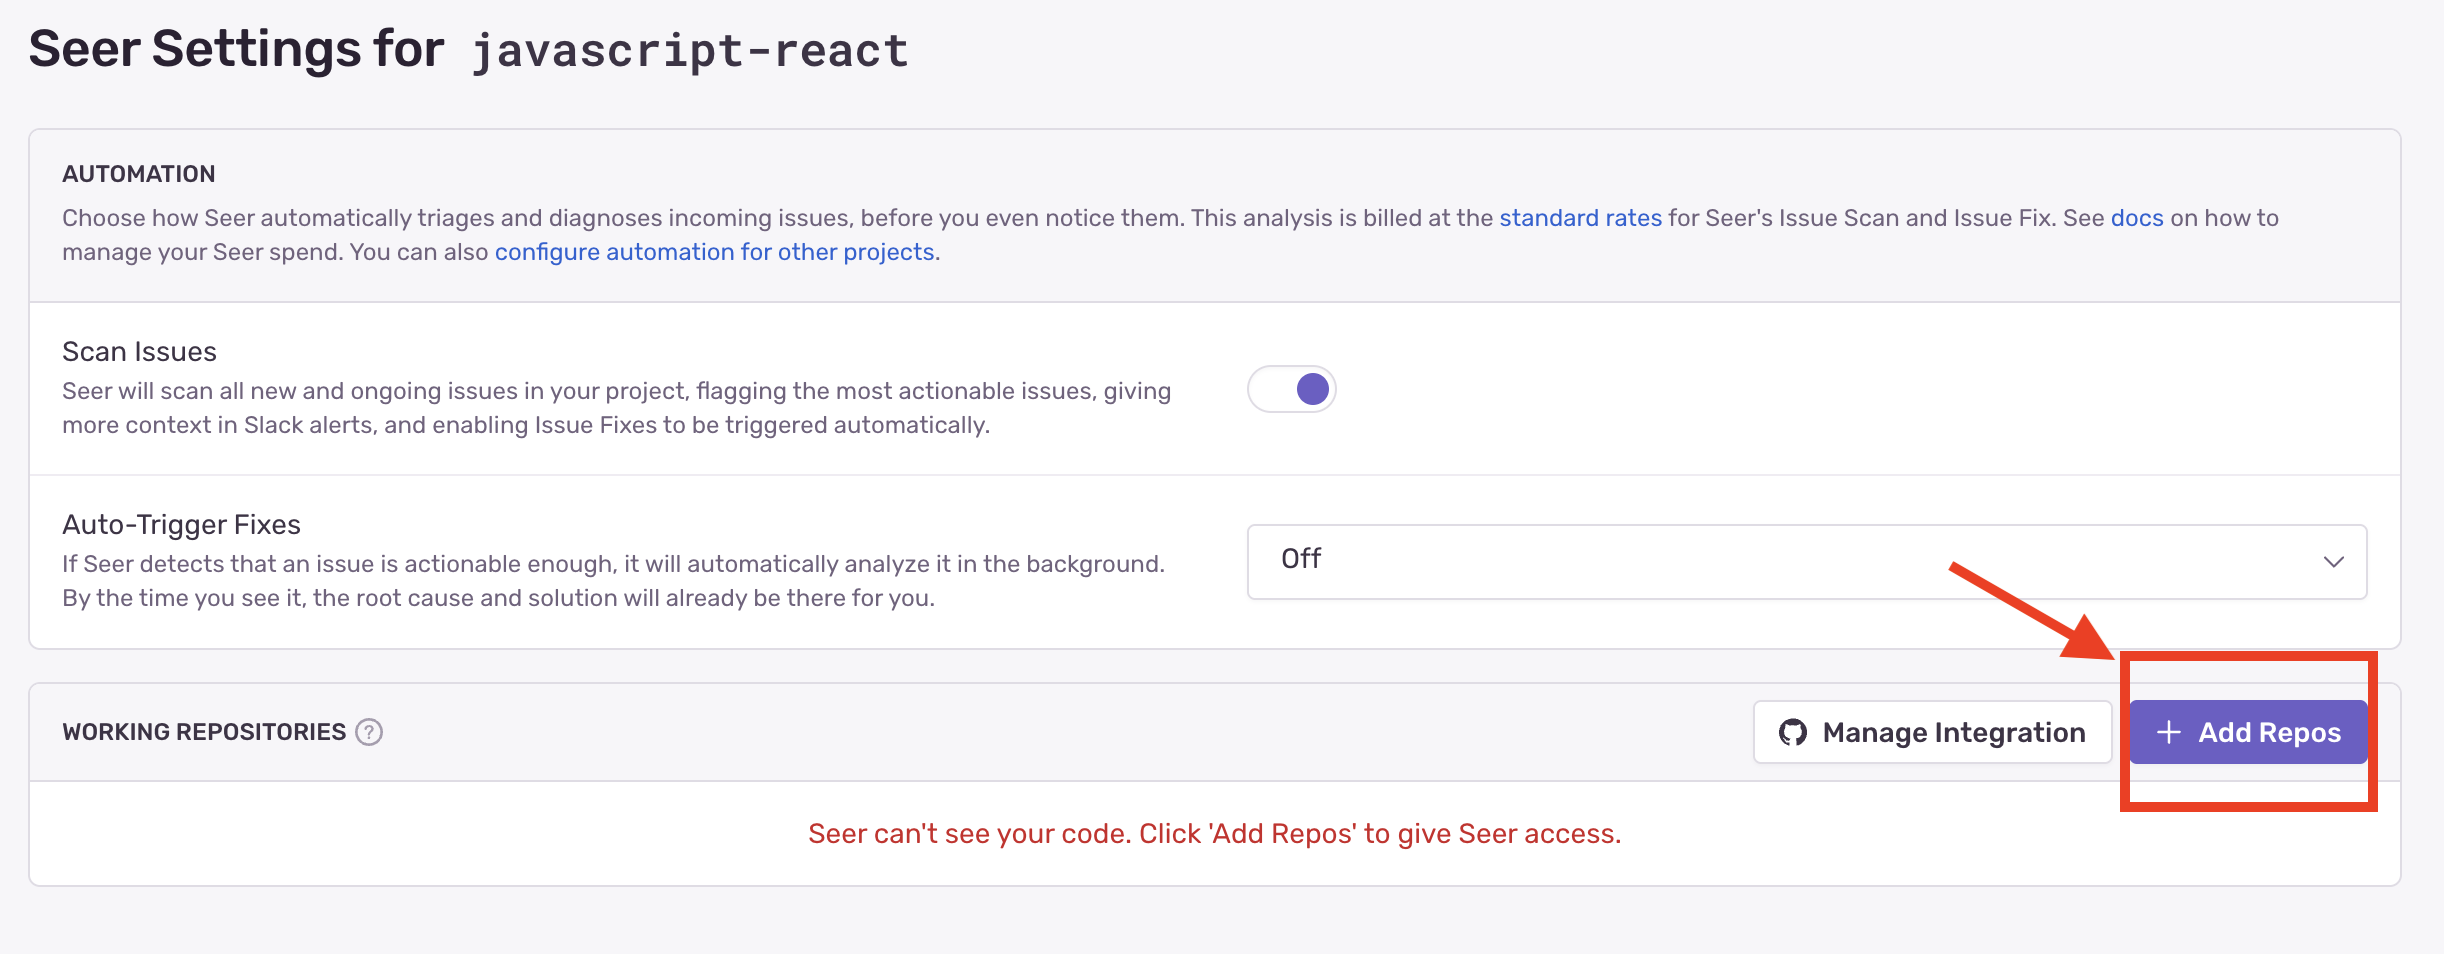
Enable Seer Automation settings in your Sentry Project(s)
In Sentry, visit Project ➡️ Settings ➡️ Seer and add your repo. We’ll do this for both the Frontend and Server applications.
Here we can fine-tune the automation settings for how we want Seer to work. Scan Sentry Issues for a root cause analysis… and then? 🤖
-
Select Start Seer
You can give Seer additional context in the text field within the Seer modal, and then click the Start Seer button to start the analysis.
Analysis in progress
You’ll be able to watch the progress of Seer as it reviews your codebase and the issue content described above. If you notice areas that are inaccurate, you can select the findings and provide additional context to help Seer understand the issue better.
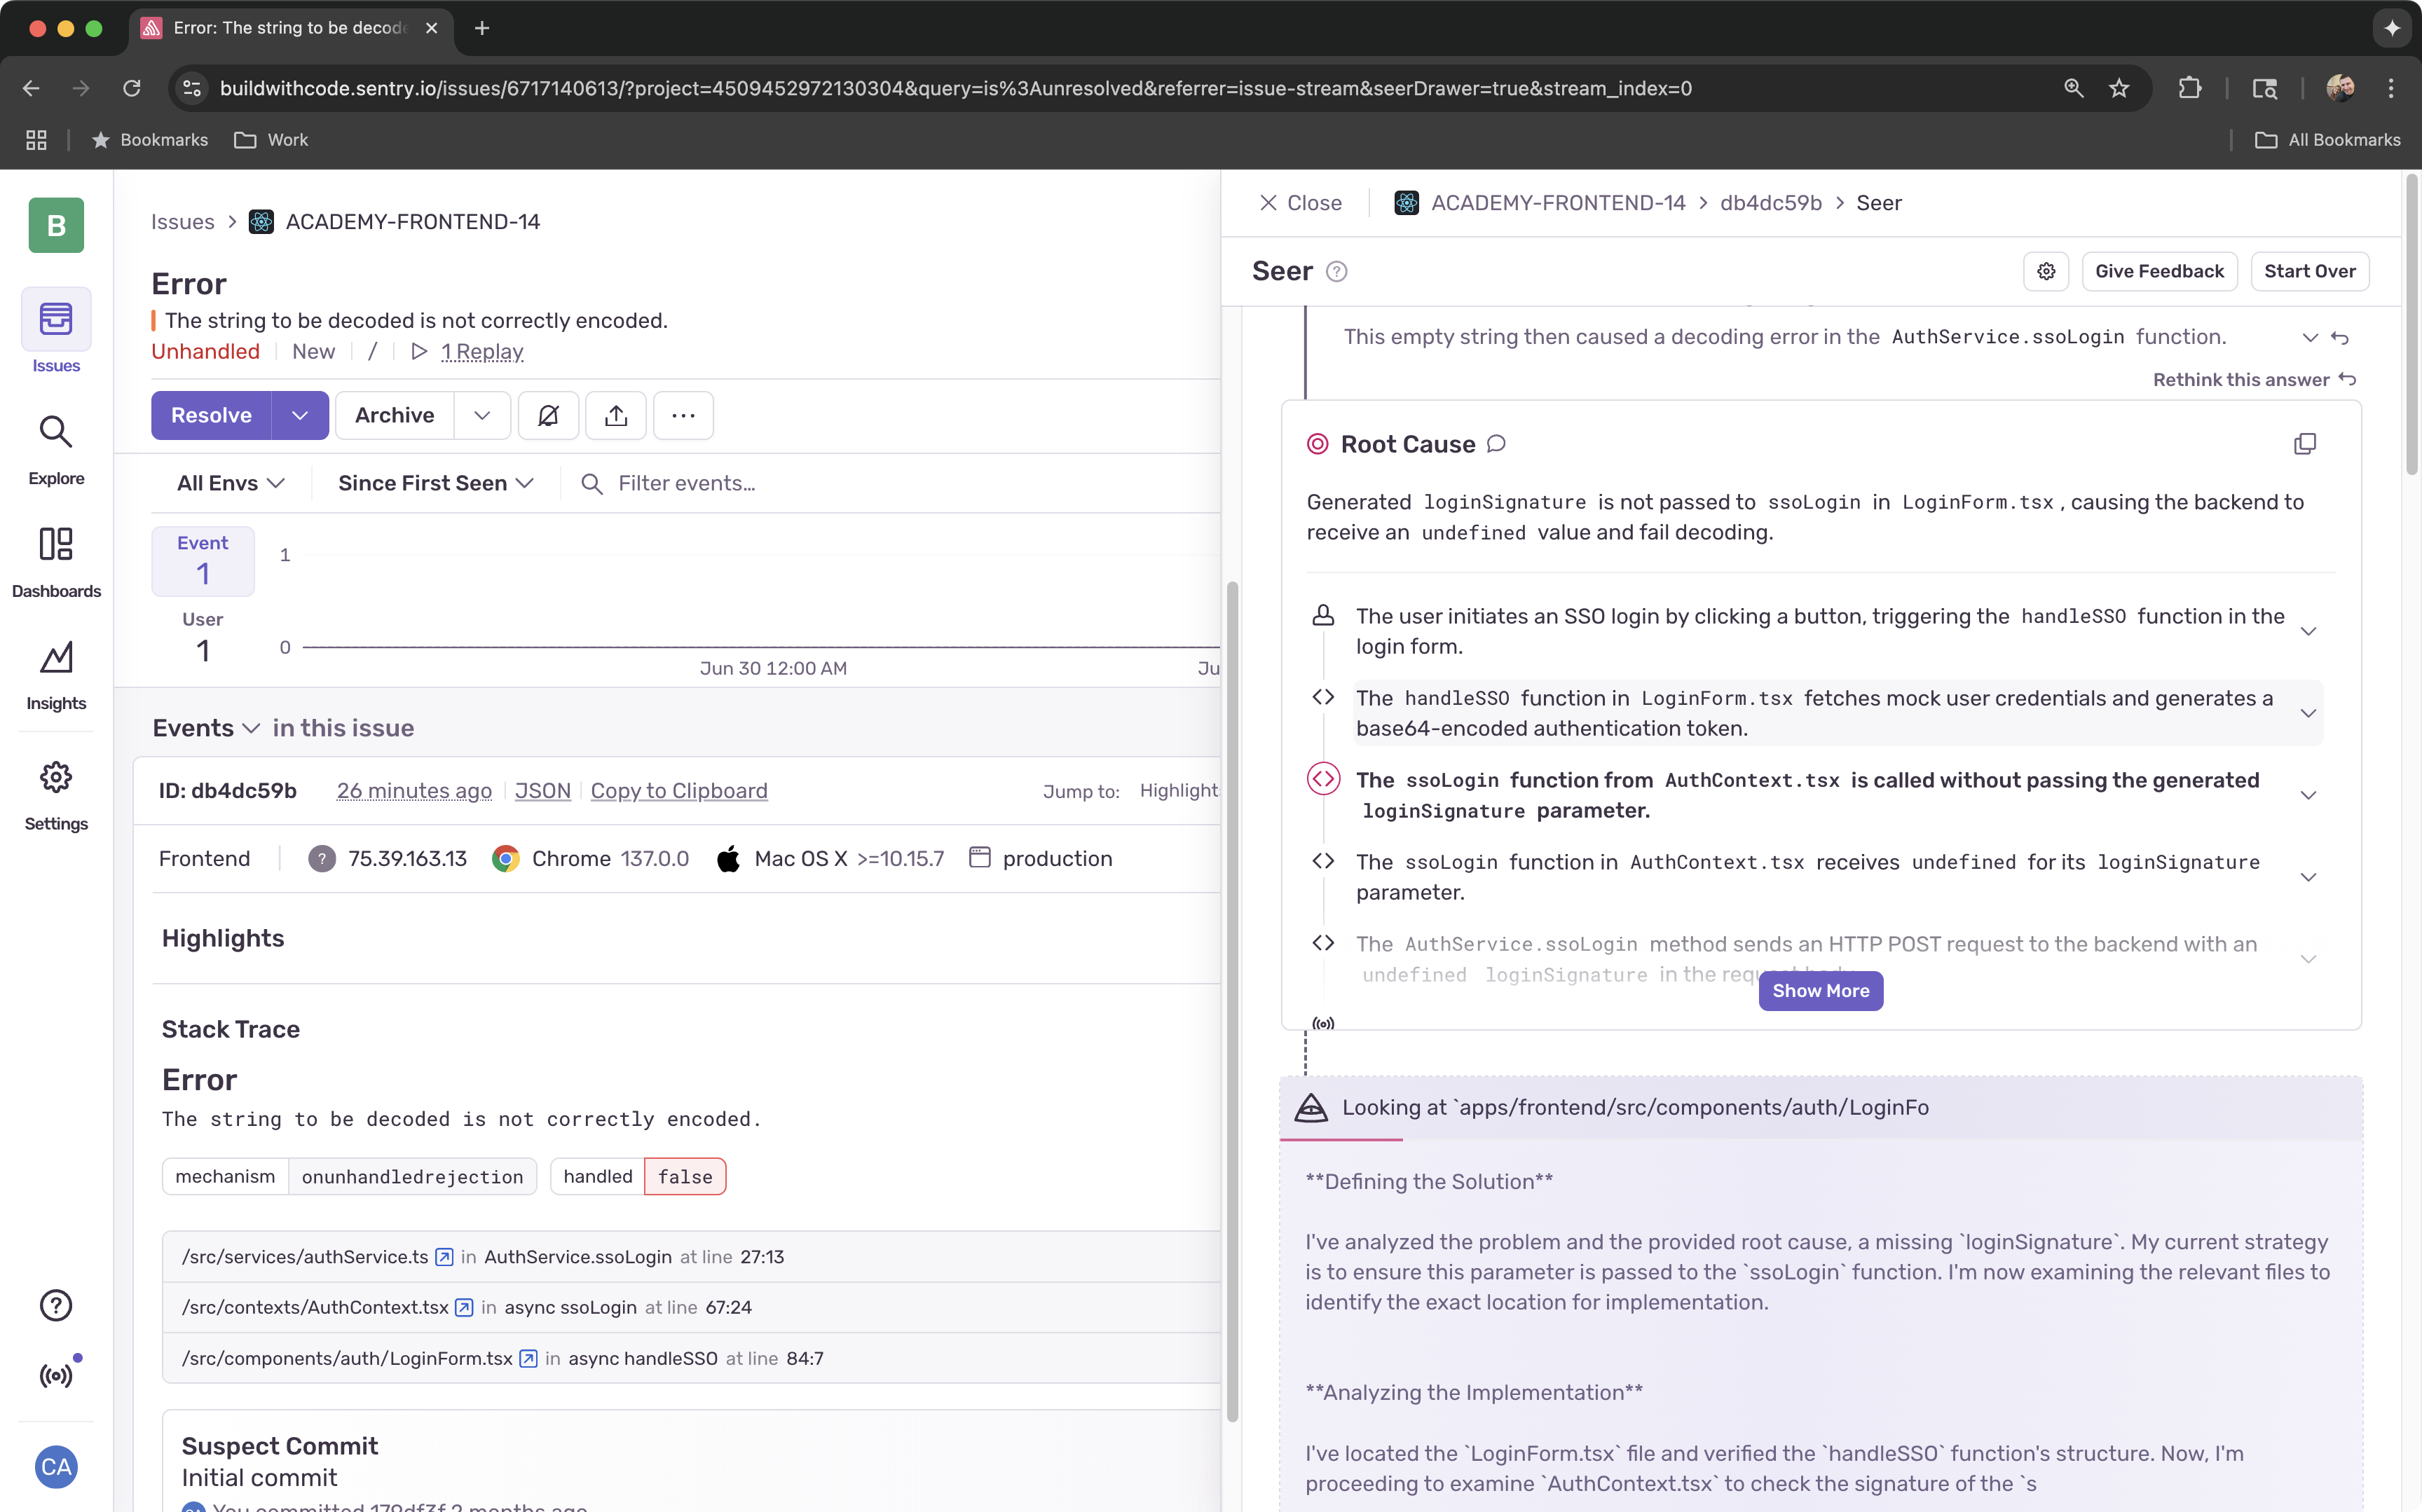
Seer’s Root Cause Analysis
As Seer progresses through the analysis, it will find multiple points to support a root cause analysis. You can interact with the these items as they are found. This allows you to potentially discard findings that are not actually relevant to the root cause analysis, or provide additional context to help Seer find more relevant root cause items as it progresses.
Solution - Code it Up!
Once the root cause is determined, Seer will provide a suggested solution, and which code in your application should be modified to support correcting the issue. You can select the “Code it Up” option for it to write up the detailed changes.
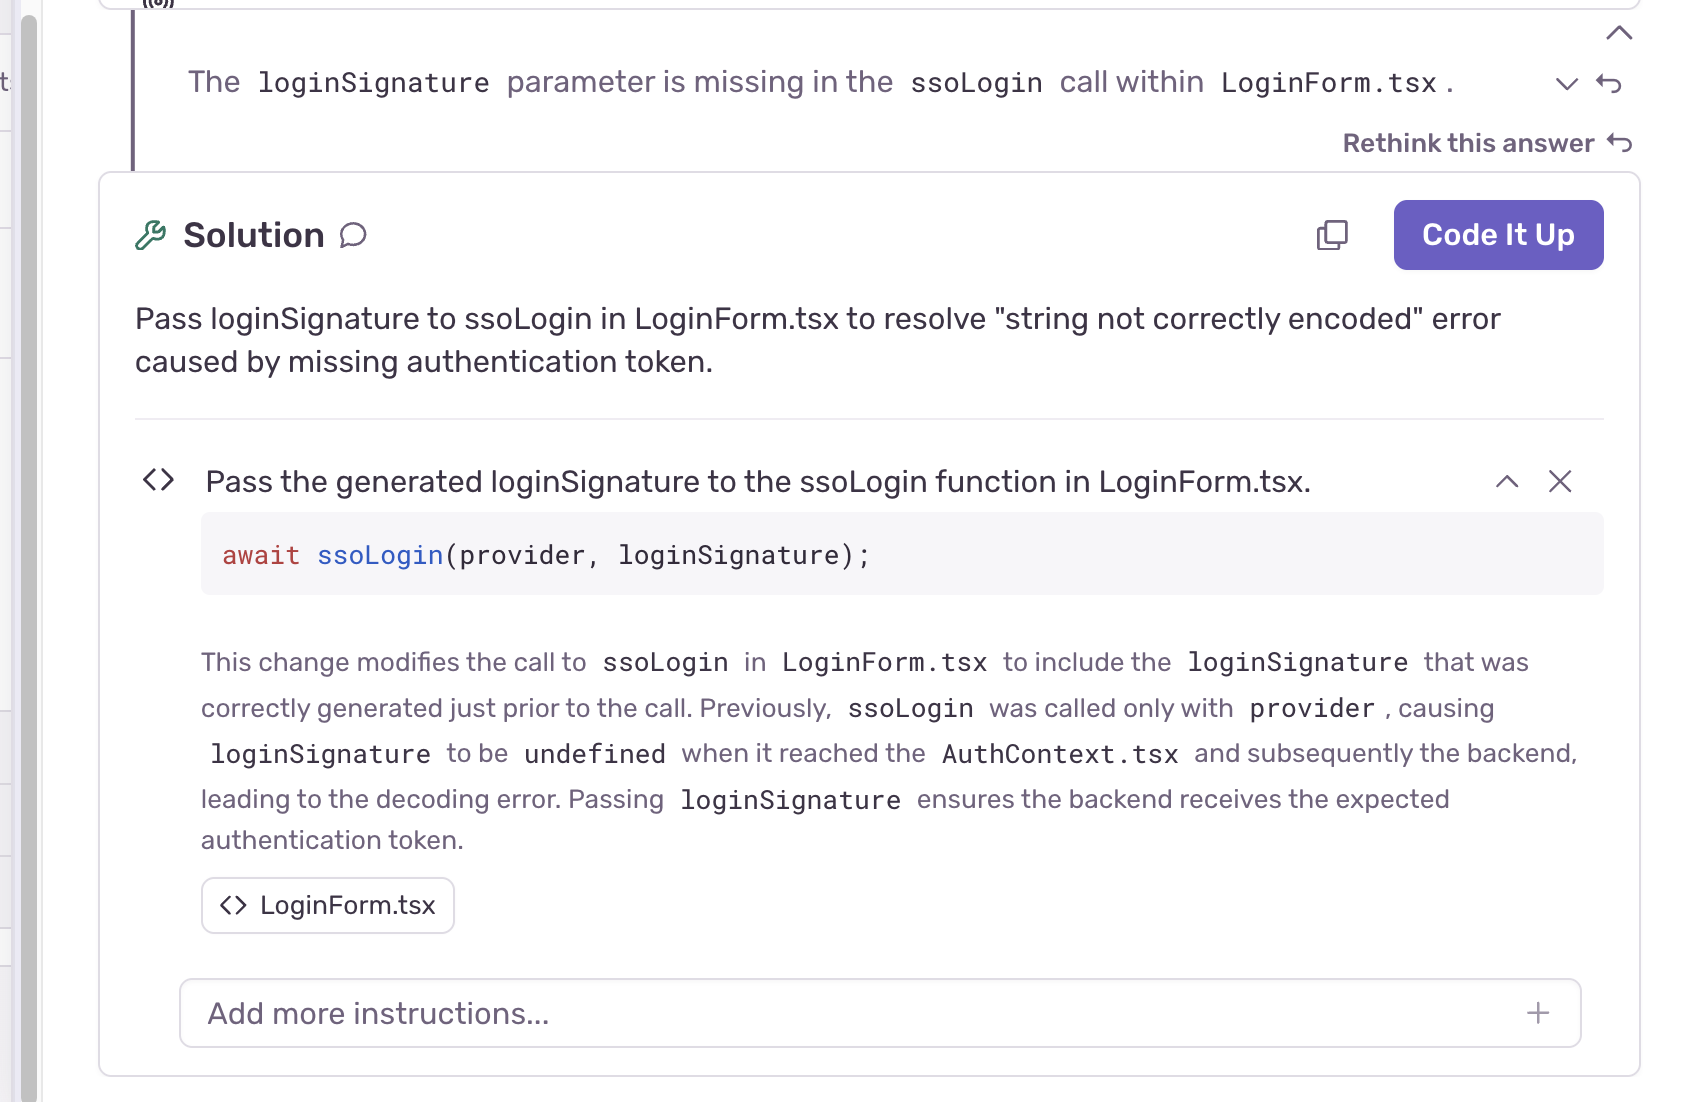
There is a small copy icon next to Code it Up that can be used to copy a summary that can be pasted into external systems (i.e. LLMs) to help implement the suggested changes.
Fix Implementation
Once “Code it Up” has finished, you’ll see the exact changes that need to be made in the application and the option to draft a PR to have Seer implement the changes for you in your GitHub repo. In our case, the ssoLogin function is missing an additional parameter that is required to be passed to the function.
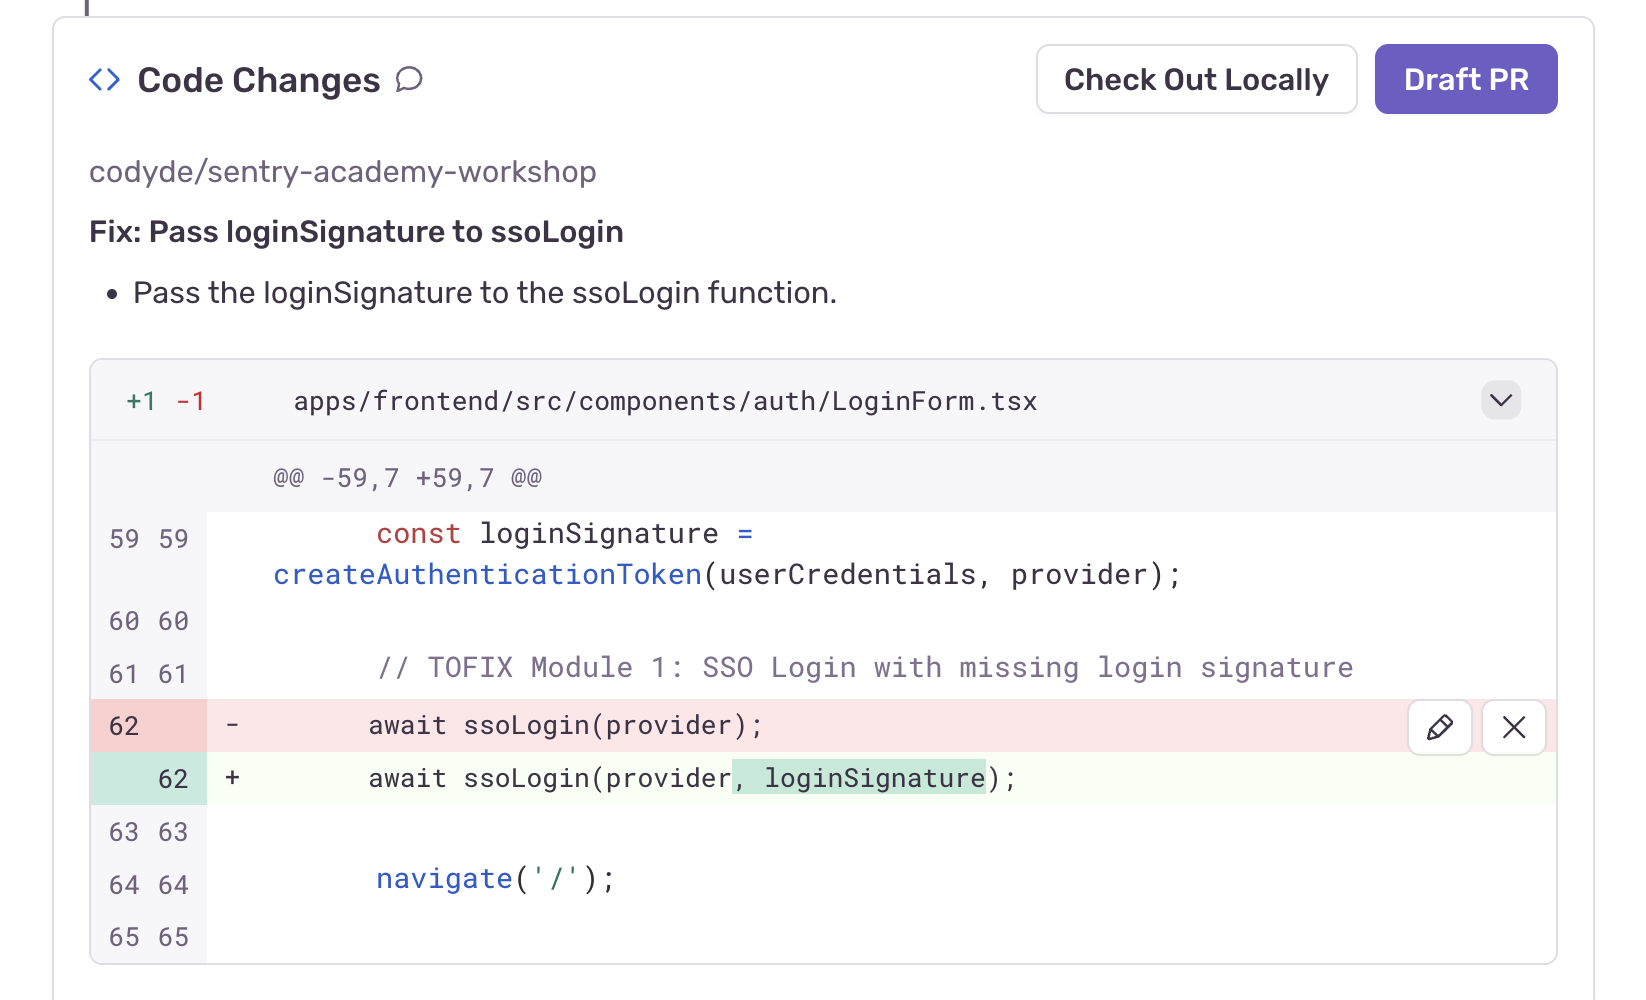
Make these changes in LoginForm.tsx by changing the line:
await ssoLogin(provider);to:
await ssoLogin(provider, loginSignature);And attempt the login again. You should be greeted with the landing page of Sentry Academy.