
Getting Started with Sentry
In this module, you’ll learn how to set up Sentry monitoring in your fullstack JavaScript application. We’ll configure Error Monitoring, Logging, Session Replays, and Tracing for both the Vite React (alongside React Router 7) frontend and the Node.js backend to give you complete visibility into your application’s behavior.
Learning Objectives
By the end of this module, you will:
- Set up Sentry Error Monitoring for both frontend and backend
- Configure Session Replays to debug user interactions
- Implement structured logging across your application
- Set up distributed tracing to track request flows
- Create your first traces and spans with meaningful context
What is Sentry?
Sentry is an error monitoring and performance monitoring platform that helps developers identify, debug, and resolve issues in their applications. Key features include:
- Error Monitoring: Automatic error detection and alerting
- Session Replays: Visual recordings of user sessions when errors occur
- Performance Monitoring: Distributed tracing and performance insights
- Logging: Structured log collection and analysis
Setting Up Sentry in Your Frontend (Vite + React + React Router 7)
Before you get into the next steps, you should create your frontend and server projects inside your sentry account.
You’ll need to take note of your Sentry DSNs along the way, which you receive when you configure the projects.
Select React and Node.js as the platforms respectively.
-
Install Sentry’s React SDK
Terminal window pnpm add @sentry/react --filter frontend -
Initialize Sentry
Create
./apps/frontend/src/instrument.tswith the following content:import * as Sentry from '@sentry/react';import { useEffect } from 'react';import {useLocation,useNavigationType,createRoutesFromChildren,matchRoutes,} from 'react-router-dom';Sentry.init({dsn: '<Your Sentry DSN>',sendDefaultPii: true,integrations: [Sentry.browserTracingIntegration(),Sentry.replayIntegration(),Sentry.reactRouterV7BrowserTracingIntegration({useEffect: useEffect,useLocation,useNavigationType,createRoutesFromChildren,matchRoutes,}),],enableLogs: true,tracesSampleRate: 1.0,tracePropagationTargets: ['localhost:3001'],replaysSessionSampleRate: 1.0,replaysOnErrorSampleRate: 1.0,}); -
Import and update your
main.tsxentry pointimport './instrument.ts';import { createRoot } from 'react-dom/client';import * as Sentry from '@sentry/react';import App from './App.tsx';import './index.css';createRoot(document.getElementById('root')!, {onUncaughtError: Sentry.reactErrorHandler((error, errorInfo) => {console.warn('Uncaught error', error, errorInfo.componentStack);}),onCaughtError: Sentry.reactErrorHandler(),onRecoverableError: Sentry.reactErrorHandler(),}).render(<App />); -
Create your ErrorBoundary (in the /components root)
Create
./apps/frontend/src/components/ErrorBoundary.tsx:import * as Sentry from '@sentry/react';import { useRouteError, isRouteErrorResponse } from 'react-router-dom';import React from 'react';const ErrorBoundary = () => {const error = useRouteError();React.useEffect(() => {// Send route errors to Sentryif (error) {Sentry.captureException(error);}}, [error]);if (isRouteErrorResponse(error)) {return (<div className="min-h-screen flex items-center justify-center bg-gray-50"><div className="text-center"><h1 className="text-4xl font-bold text-red-600 mb-4">{error.status}</h1><p className="text-xl text-gray-600 mb-4">{error.statusText}</p><p className="text-gray-500">{error.data}</p></div></div>);}return (<div className="min-h-screen flex items-center justify-center bg-gray-50"><div className="text-center"><h1 className="text-2xl font-bold text-red-600 mb-4">Something went wrong</h1><p className="text-gray-600 mb-4">{error instanceof Error ? error.message : 'Unknown error occurred'}</p><buttononClick={() => window.location.reload()}className="px-4 py-2 bg-blue-600 text-white rounded hover:bg-blue-700">Reload page</button></div></div>);};export default ErrorBoundary; -
Update your
App.tsxto include Sentry Error Boundary and React Router// previous importsimport * as Sentry from '@sentry/react';import ErrorBoundary from './components/ErrorBoundary';const SentryRoutes = Sentry.withSentryReactRouterV7Routing(Routes);// Protected route componentconst ProtectedRoute: React.FC<{ children: React.ReactNode }> = ({children,}) => {const { isAuthenticated, isLoading } = useAuth();if (isLoading) {return <div>Loading...</div>;}if (!isAuthenticated) {return <Navigate to="/login" replace />;}return <>{children}</>;};function App() {return (<AuthProvider><UserStateProvider><Router><SentryRoutes><Routepath="/login"element={<LoginPage />}errorElement={<ErrorBoundary />}/><Route path="/" element={<MainLayout />}><Routeindexelement={<ProtectedRoute><HomePage /></ProtectedRoute>}/><Routepath="courses"element={<ProtectedRoute><CoursesPage /></ProtectedRoute>}errorElement={<ErrorBoundary />}/><Routepath="courses/:courseId"element={<ProtectedRoute><CourseDetailPage /></ProtectedRoute>}errorElement={<ErrorBoundary />}/><Routepath="my-courses"element={<ProtectedRoute><MyCoursesPage /></ProtectedRoute>}errorElement={<ErrorBoundary />}/><Routepath="ai-course-builder"element={<ProtectedRoute><AiCourseBuilderPage /></ProtectedRoute>}errorElement={<ErrorBoundary />}/><Routepath="favorites"element={<ProtectedRoute><FavoritesPage /></ProtectedRoute>}errorElement={<ErrorBoundary />}/><Routepath="lesson-plans"element={<ProtectedRoute><LessonPlansPage /></ProtectedRoute>}errorElement={<ErrorBoundary />}/><Routepath="profile"element={<ProtectedRoute><ProfilePage /></ProtectedRoute>}errorElement={<ErrorBoundary />}/></Route><Routepath="*"element={<Navigate to="/" replace />}errorElement={<ErrorBoundary />}/></SentryRoutes></Router></UserStateProvider></AuthProvider>);}export default App; -
Setup the Vite plugin with Sentry’s Wizard
We can use Sentry’s wizard to help us setup the Vite plugin. The Vite plugin takes care of the sourcemaps for us.
Terminal window cd apps/frontend && pnpx @sentry/wizard@latest -i sourcemapsThis will trigger a series of prompts:
- Select
Yesif you get notified about uncommitted files - Select
Sentry SaaSwhen you get asked about what type of Sentry account you have - Select
Yesif you already have a Sentry account - This will open a browser window that lets you select your organization and (frontend) project
- Once you do, you’re back to the terminal and you’ll be prompted about the bundler, so select
Vite - Select
PNPMas the package manager - Select
Nowhen asked about using a CI/CD tool
That’s it! The
vite.config.tsfile will be updated, and you’ll see a.env.sentry-build-pluginfile next to your.envfile.Now when we build our frontend, the Vite plugin will automatically upload the sourcemaps to Sentry an link them to our project and release.
- Select
These configurations will setup your React frontend to leverage all of Sentry’s core capabilities and ensure you’re capturing Errors, Traces, Logs, and Replays within your frontend application. Let’s move onto the backend.
Configuring Sentry in your Backend (Node.js)
-
Install Sentry SDK for Node.js
Terminal window pnpm add @sentry/node --filter server -
Configure Sentry in your Node.js Server
Create
./apps/server/instrument.tswith the following content:import * as Sentry from '@sentry/node';Sentry.init({dsn: '<Your Sentry DSN>',enableLogs: true,debug: true,tracesSampleRate: 1.0,}); -
Import and update your
index.tsentry pointimport './instrument';import * as Sentry from '@sentry/node';// Add this after all routes,// but before any and other error-handling middlewares are defined.Sentry.setupExpressErrorHandler(app); -
Use Sentry’s Wizard again to setup sourcemaps in the server project
Terminal window cd ../server && pnpx @sentry/wizard@latest -i sourcemapsThe prompts will be the same, with the only difference this time being that we’ll select
esbuildinstead ofVite.Be sure to add the generated
sentryEsbuildPluginin the plugins array of the build configuration inapps/server/build.jsconst { sentryEsbuildPlugin } = require('@sentry/esbuild-plugin');require('esbuild').build({sourcemap: true, // Source map generation must be turned onplugins: [// Put the Sentry esbuild plugin here after all other plugins],});
With these configurations in place, you’ve now got Sentry setup to monitor your application across both the frontend and server side implementations.
If you are currently running your application, it might be a good idea to toss a restart on it (from the root) after all of these configurations.
cd ../..pnpm devOnce that’s loaded, you can browse to http://localhost:5173 to view Sentry Academy.
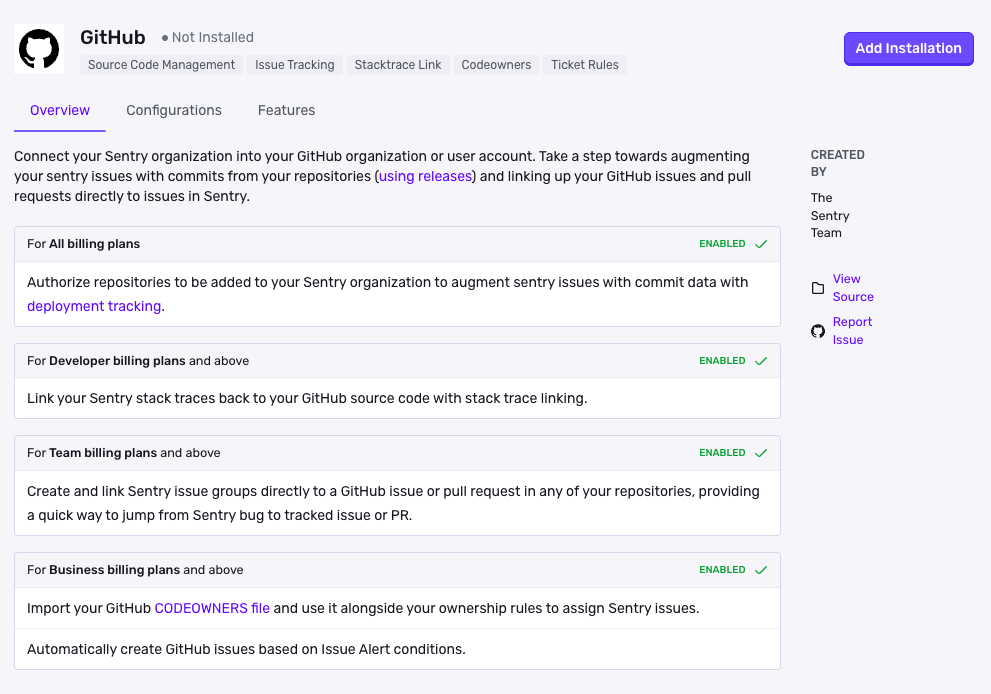
Configuring GitHub
Now we need to ensure that Sentry and Github are properly configured so that later we can use Seer. This way Seer will have the full context of our code base and will be able to provide us with the best possible suggestions. We can even have it open PR’s for us once it’s determined root causes and applied fixes of errors found in Sentry.
-
Enable generative AI features
In Sentry, make sure AI features are enabled in your organization settings.
-
Set up the Sentry GitHub integration
- Navigate to Organization Settings ➡️ Integrations ➡️ GitHub
- If you have the legacy GitHub integration installed, use the button next to GitHub to Upgrade. If you don’t have the legacy GitHub integration installed, click to Install.
- In the next view, click “Add Installation”.
- A GitHub install window should pop up. Click to “Authorize” Sentry.
-
Select which repositories Sentry should have access to (or select all repositories). You may see a flow to choose the repo or organization to integrate with.
-
Return to the Sentry Integrations page.
-
Navigate to your new GitHub instance in Sentry, click the “Configurations” tab, then choose “Configure” on your instance
-
All of your repositories will be added by default, you just have to refresh your screen. To only add select repositories, choose them from the dropdown list. Make sure you have given Sentry access to these repositories in GitHub in the previous steps.